
Inventory Orders allow you to create a Supplier specific order. Supplier part numbers and costs will be included to ease the ordering process. The supplier contact information will also be shown to assist you. As items arrive, update the order with the quantity received to ensure all items are received.
To Create An Inventory Order:
- Click on “Features” -> “Inventory“.
- Click on “Inventory Orders“.
- Click on “Create New Order“.
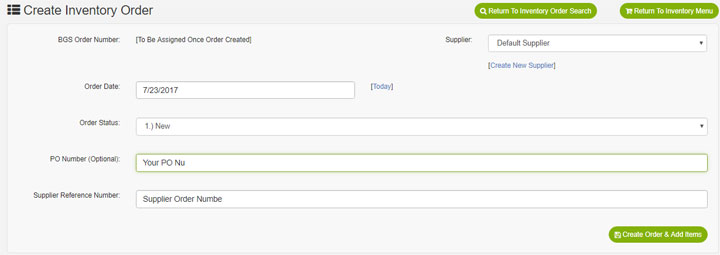
- The Inventory will generate a BGS Order Number once the Order is created.
- Select the “Supplier“. Only items from this Supplier will be available to be ordered on the following page.
- Enter the “Order Date” or click “Today” to use today’s date.
- The Order status will be selected as “1.) New” by default.
- If you have a PO Number, this can be entered.
- If the supplier issues an order number to you, this can be entered in the “Supplier Reference Number“. This field can be left blank until you place the order with the supplier.
- Click “Create Order & Add Items“.
Add Items To An Order (Manual Method):
- Locate the Inventory Order & Click “Edit / Receive Inventory Order“.
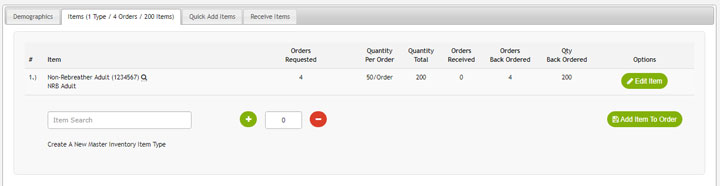
- Click on the “Item (x)” tab.
- Enter the at least two letters to search for the Item you want to order.
- Click on the Inventory Item Name from the Item Search box.
- Enter the “Orders Requested“. Note: Items may come in a case so 1 order = 50 items. Be sure to review the “Quantity Per Order” column so you request the correct number of Orders not Quantity.
- Click “Add Item To Order“.
- If you selected the wrong item prior to adding item to the order, click “Remove / Reset”.
- If you already added the wrong item or want to remove the item click “Edit Item” and click “Delete Order Item“.
- If the Supplier Part Number, Qty Per Order, or Cost Per Order is wrong, these can be updated by clicking “Edit Item” and clicking the Pencil icon next to the Supplier Information. Alternatively, these items can also be edited from the Inventory View Item page also.
- Once all items have been add to the order, click “Save Inventory Order“.
- Contact the Supplier to order. The supplier reference number can be added to the demographics page and Order status adjusted as needed.
Add Items To An Order (Quick Add Items Method):
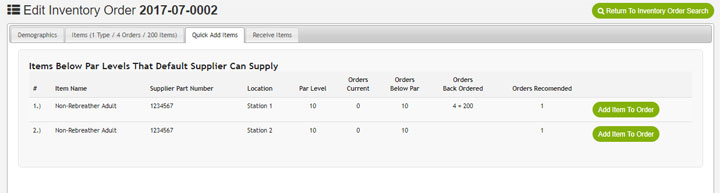
The Quick Add Items tab determines items that are below par that the Supplier can provide. This will search all Inventory Locations and Sub-Locations.
- Locate the Inventory Order & Click “Edit / Receive Inventory Order“.
- Click on the “Quick Add Items” tab.
- Click “Add Items To Order” next to the items this supplier can provide.
- Once all items have been add to the order, click “Save Inventory Order“.
- Contact the Supplier to order. The supplier reference number can be added to the demographics page and Order status adjusted as needed.
Note: The quick add links are broken down by Location. Items will be duplicated since one case of items could go to one location and another case to another location. If you want to order only one case and split the items upon arrival, then adjust your order total accordingly.
Note: Using the Quick Add, the items will remain on the page after you click “Add Item To Order” this stays as a reference for where these items should do.
Note: If an item is already to this order or another order and not yet received, a quantity will be shown in the “Orders Back Ordered” column.
Receive An Order From Supplier:
Once some or all of the items from arrived, you can update the Inventory Order Status and also which items have been received.
- Click on “Features” -> “Inventory“.
- Click “Inventory Orders“.
- Click on the Order from the list.
- Click “Edit / Receive Inventory Order“.
- Click the “Receive Items” tab.
- Click the button “Receive Item” next to the item that arrived.
- The Orders Received will pre-populate with the total number of orders not received. If you only received a partial shipment, adjust this number down.
- Select the “Location Received To” to automatically add these items to the specific Inventory Location.
- If part of the order will go to one location and the remaining to another location, then set the “Orders Received” to the number you want at Location #1 and click “Save & Receive Item“. Then repeat for the remaining items at Location #2.
- Click “Save & Receive Item“.
- Repeat steps 5-10 as needed.
- Once all orders have been received, update the Inventory Order Status on the demographics tab.
Great, You’ve reviewed all the Help Guides for the inventory. Here are the links to other Inventory Help Guides.
All Inventory Help Guides: Click A Link Below To Explore The Inventory Features