
The Support Center has two distinct features:
- Request new features from the scheduler.
- Create and manage process improvement / QA procedures for your system.
We will look at each of these individually.
Overview:
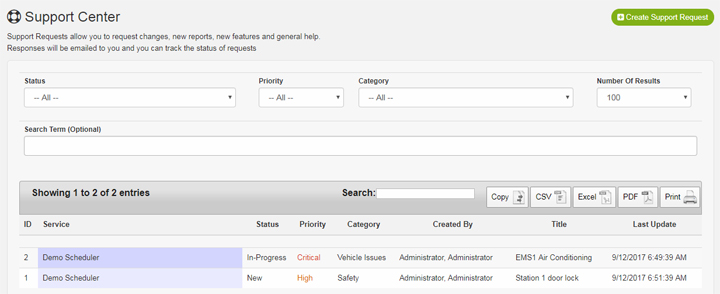
The support center is located under the “Features” menu. A listing of all requests will be shown and new requests can be created by clicking “Create Support Request“.
Request New Features / Report Issues:
The support center has several categories of requests including Error Report, Feature Requests, and General Help. Each of these categories will automatically be routed to BGS and an email will be sent when a request is created or updated. This will ensure that you always know the status of your request. If you need a new report or have an issue with the scheduler, a support request can be created to address your issue. All issues should be routed through the support center.
Create and manage process improvement / QA procedures for your system:
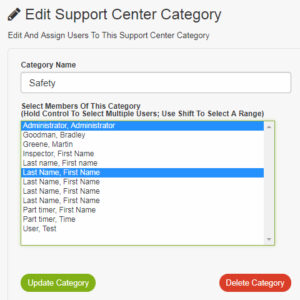
Your scheduler comes with several categories by default: Process Improvement, Safety and Vehicle issues. Categories can be created or removed through “System Configuration” -> “Support Center” -> “Support Center Categories“. Each category will have 1 or more users that belong to the category.
Example: All vehicle related issues are designated to 2 users. You can create a category called “Vehicle Issues” and assign these two users. Each time a new request is created, both users will be notified and also be able to respond back to the creator with the progress & resolution of the issue.
Users assigned to the category (ie Vehicle Issues), the creating user of the request, and users with the permission “SysOp” can see every request and the notes.
Assigning Users To A Support Center Category / Change Category Name:
1 or more users can be assigned to each category.
- “System Configuration” -> “Support Center” -> “Support Center Categories“.
- Select the category
- Enter the “Category Name“
- Select 1 or more users. Hold CONTROL + Click on the user name to select multiple users.
- Click “Update Category“
Note: Adding/Removing users from a category will not change the users assigned to existing requests. (ie A request is created for Vehicle Issues that has User1 and User2 assigned. If you remove User2 from the category, User2 will still remain on the existing requests for continuity of the request.
Permissions / Users Able to View Requests:
The user creating the request will always be allowed to see Open or Closed requests. Each support request will have a category assigned. This category will have 1 or more users assigned. The request will automatically associate the users in the category to the request. Additional users can also be added to the request. And finally, all users with the “SysOp” permissions can also view any request.
Support Request Properties:
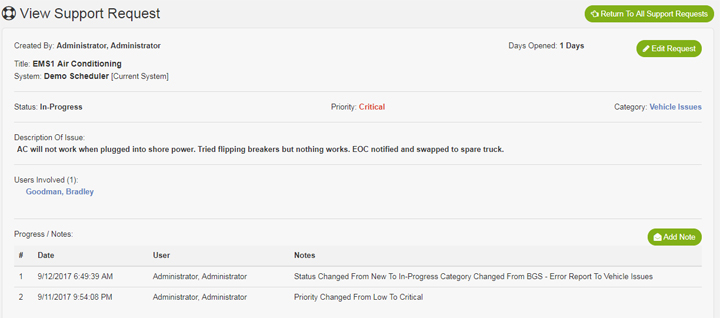
The support request will have valuable information including
- Creating User
- Date/Time request created
- Current Status (New, In-Progress, Pending, On Hold, Completed)
- Priority (Low, Medium, High, Critical)
- Category (Safety Issue, Vehicle Issue, etc) Categories are editable through System Configuration
- Description of the issue
- Users Involved (Users from the category + Additional users as needed)
- Notes section (Any changes to the request and also progress/resolution of the request)
Creating A Support Request:
- Click on “Features” -> “Support Center“
- Click “Create Support Request“
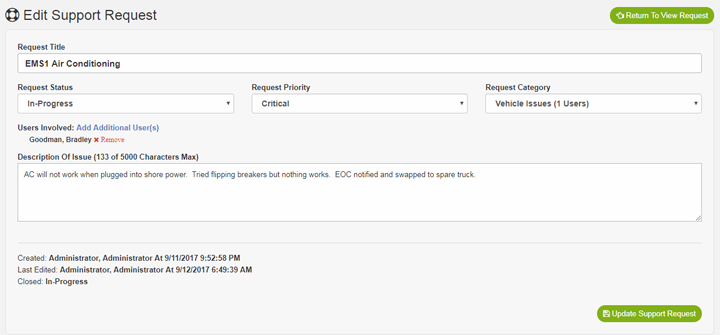
- Enter the Request Title
- Select the Request Priority (Low, Medium, High, Critical)
- Select the Request Category (ie Safety Issue, Vehicle Issue)
- Enter the Description Of Issue
- (Optional) Assign additional users by clicking “Add Additional Users(s)” (ie your partner or a witness)
- Click “Create Support Request“
Once the request has been created, the creating user and all users assigned to the Request Category will receive an email that the request has been created. Any changes / resolution to the request will also be emailed to you.
Editing A Support Request:
You are always able to edit the request and add additional information. If the issue is initially marked as “Completed” but then returns, the request can be re-opened.
- Click on “Features” -> “Support Center“
- Locate the support request using the search features
- Click “Edit Request” to edit the request upper section or click “Add Note” to document progress/resolution of the issue.
Completing A Support Request:
Completing a support request is the same procedure as editing a support request. Select “Completed” from the “Status” selector.