
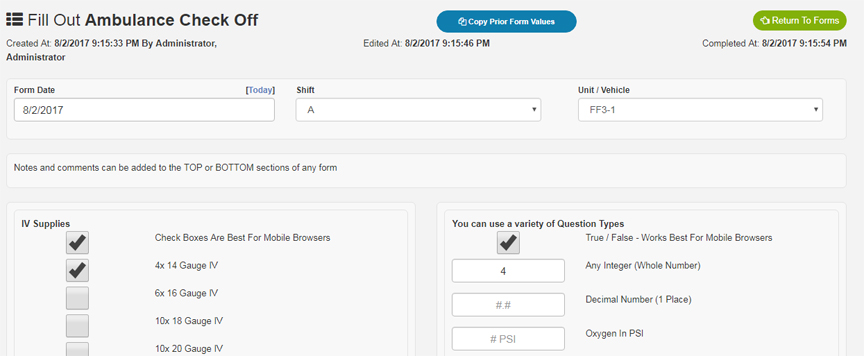
Truck Check Forms allow users to quickly complete truck check offs from their phone or any computer.
Key Points:
- Use True/False options if possible to improve the User’s experience and reduce time to fill out form.
- Create as many Forms as necessary depending on your Unit/Vehicles configurations (ie QRV and another for Ambulance)
- Use Drag & Drop to move categories and organize questions in each category.
This guide will assist you with creating a new truck check off form.
- Click on “Features” -> “Truck Check Off” OR click “Truck Check Off” from the home page Quick Links section.
- Existing truck check forms will be shown in the table.
- Click “Add New Master Form Type“.
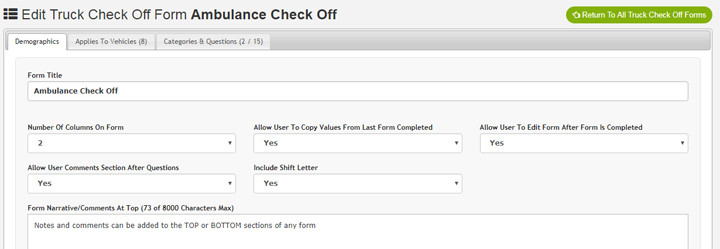
- Enter the name of the Truck Check form and click “Create Master Form Type“. Examples include “BLS Check Sheet”, “ALS Check Sheet”, “Medications”, “QRV”, “Ambulance” etc.
- Select the number of columns on the form (Between 2 and 4). Typically 2 or 3 will allow the most usability of your form.
- If users can “copy” the last filled out form to use the same values, select “Allow User To Copy Values From Last Form Completed” as Yes.
- If users can edit their form after it is completed (locked-out), select “Allow User To Edit Form After Form Is Completed” as Yes.
- If users can enter comments into the form, select “Allow User Comments Section After Questions” as Yes.
- If users can enter the Shift Letter on the form, select “Include Shift Letter” as Yes.
- Forms can contain directions/instructions/additional information in a Top and/or Lower narrative section on each form. Enter your directions/instructions/info into either section as needed.
- Next, click on “Applies To Vehicle” tab.
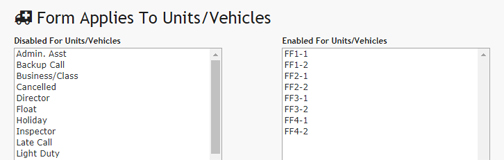
- Click on your Units and Vehicles to enable which Units this form will apply to. By default, all units are enabled. Units/Vehicles like Admin call, late duty etc should be removed. Units/Vehicles can be removed by clicking on the Unit Name in either table.
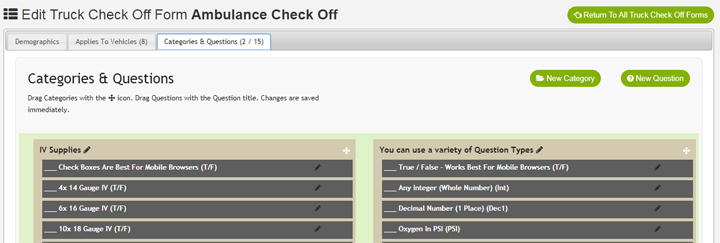
- Next, click on “Categories & Questions” tab.
- Questions are organized into 1 or more categories.
- Categories can be created by clicking “New Category“.
- Once all categories have been added, being creating questions by click “New Question“.
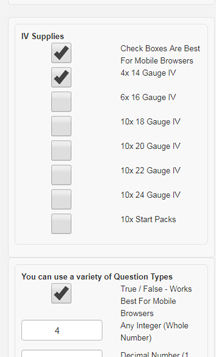
- The Question type allows information to be gathered quicker from users. Ie. Integer (Whole number) type questions will bring up a number only keypad on the users phone instead of a full keyboard. True/False check boxes will allow users to quickly click on an option.
- Utilize True/False options if possible to reduce the amount of time it takes for users to complete the check off.
- Note: When creating questions, the prior Category and Question type will be automatically selected.
- Click “Create Question & Add Another Question” to add the next item.
- Once all categories and questions have been created, you can drag & drop both Categories and Questions as needed.
- To Move a category, click the CURSOR icon the right of the category title and drag to another location.
- To Edit a category, click the PENCIL icon next to the category title.
- To Move a question, click on the Question Title and drag to another location.
- To Edit a question, click the PENCIL icon to the right of the question.
- Once all edits are done, click “Update Truck Check Form“.
Truck Check Form On Desktop Computer
Truck Check Form On Mobile Phone
Review the User’s Guide on filling out Truck Check Forms here.
Truck Check Forms – Creating & Editing Truck Check Forms