
There are two kinds of lists inside of iOps360. The first list is centered around the schedule and tracking when staff are utilized . This will keep track of the last date and time a user was utilized from the list such as tracking additional overtime shifts . The second kind of list is the employee call list . This will function similar but is utilized manually allow you to record a Yes no Maybe response , and any additional notes. This is useful for Getting information from staff such as a uniform or if you are unable to find coverage and have to resort to manually dialing staff after all other avenues have been exhausted. There are two types of lists inside iOps360, each designed for a different purpose.
1. Schedule‑based utilization lists These lists are tied directly to the schedule and track when staff members are used. Each time someone is assigned or utilized—such as filling an overtime shift—the system records the exact date and time they were last used. This helps you manage fairness, rotation, and workload distribution.
2. Employee call lists These lists work differently. They’re used for manual outreach and let you record a Yes / No / Maybe response along with any notes. They’re helpful when you need information from staff (like uniform details) or when you’ve exhausted automated options and must manually call employees to find coverage. If you have sent notifications for coverage but are not getting any responses, this system will allow you and other supervisors to tag team the effort by working on it simultaneously. Changes are saved real time along with the user and date time doing to calling.
Creating an Over Time List
Overtime Lists are utilized inside the Schedule for Open Shifts and Bid Notifications. You can use these lists outside of Over Time shifts also. Once created, you can edit any open shift, click “Use From Call List”, select a staff member and Save. This will move the user to the bottom of the list and update the list. If a user is deleted from a shift, their prior position will be restored on the list.

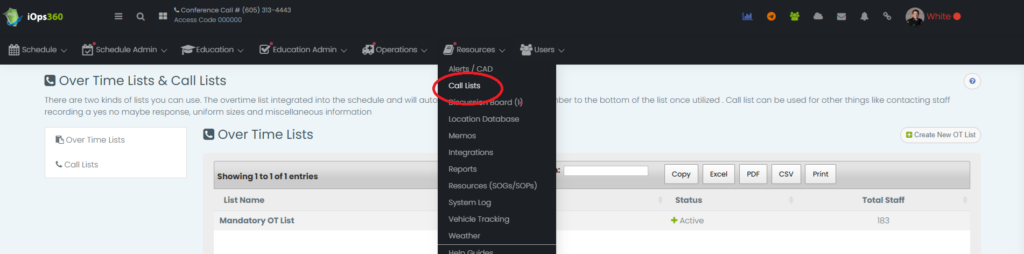
- From the Menu bar, select Resources -> Call Lists. If this menu item is not present, be sure to enable this Module in System Config > Modules.
- Decide if this list will be used with the Schedule (Open Shifts and Bids) and click “Create New OT List“
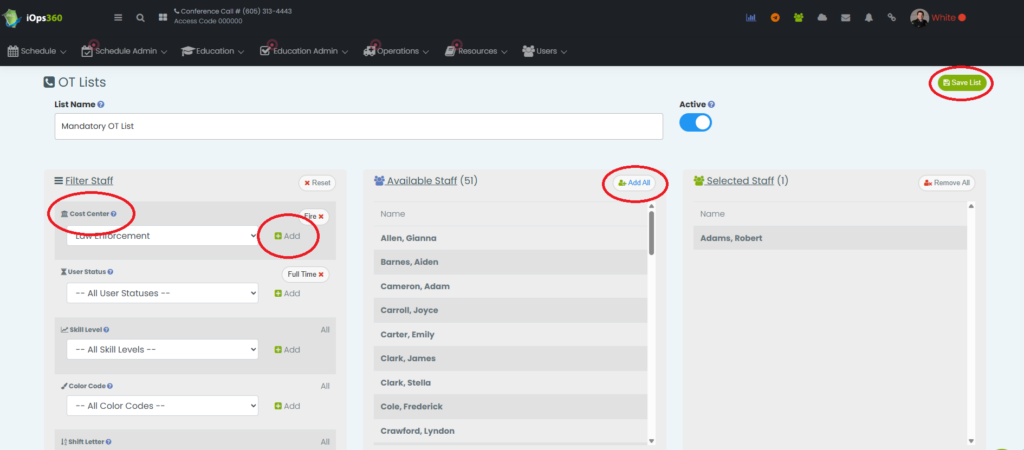
- Enter a name for the call list such as “Mandatory OT List”.
- Use the filters on the left to limit the Available Staff List to the users applicable. Click “Add All” above the Available Staff to select all of the users and move them to the “Selected Staff” column. You can also double click on any name to add the users too.
- Once all users have been selected, click “Save List“
Using an Over Time List
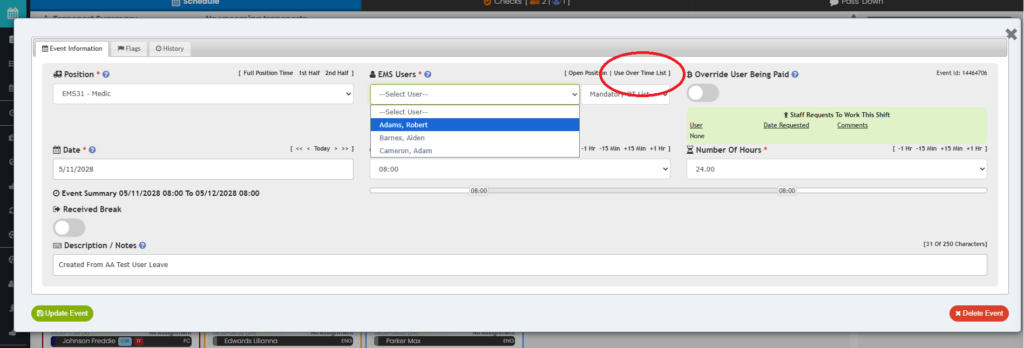
From the Schedule Editor or Create Bid menu, you can select the List to utilize. Click “Use Over Time List” and select the list from the drop down. The staff will be shown in the order they are in the OT List. Once the shift is saved, the user will be automatically updated in the List.
Creating an Employee Call List
To create a user list for any other purpose, you can create an Employee Call List.
- From the Menu bar, select Resources -> Call Lists. If this menu item is not present, be sure to enable this Module in System Config > Modules.
- Decide if this list will be used with the Schedule (Open Shifts and Bids) and click “Create New OT List“
- Enter a name for the call list such as “Mandatory OT List”
- You can enter an optional “Reference Date” for quick access to the schedule for that day
- Use the filters to add Cost Centers, User Statuses (FT/PT/PRN/Salaried), Skill Level and User Roles. Users that match the filters will be added into the “Available Staff” list
- Click on specific users from the Available Staff list to move them to the Selected Staff list. Alternatively, you can click “Add All” to move all available staff to the selected list
- Adjust filters as needed to add additional users
- Once all users have been added, click “Save List“
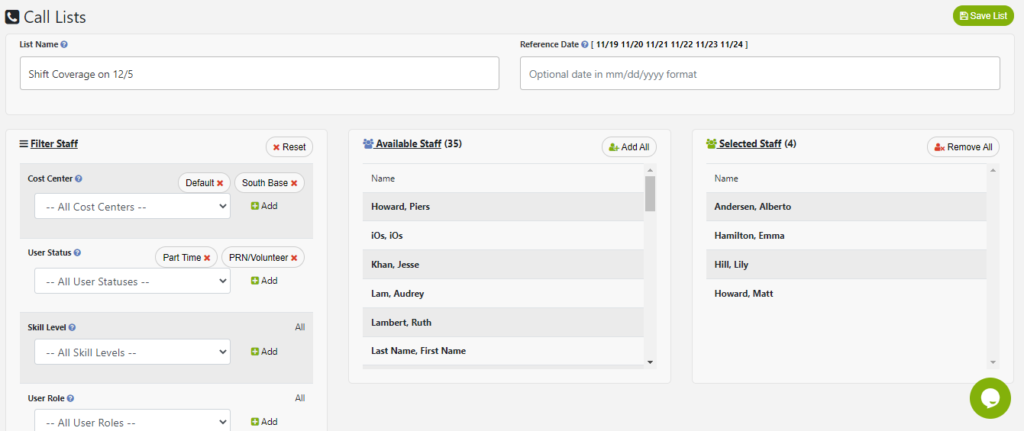
Enter a name
Editing and Completing an Employee Call List
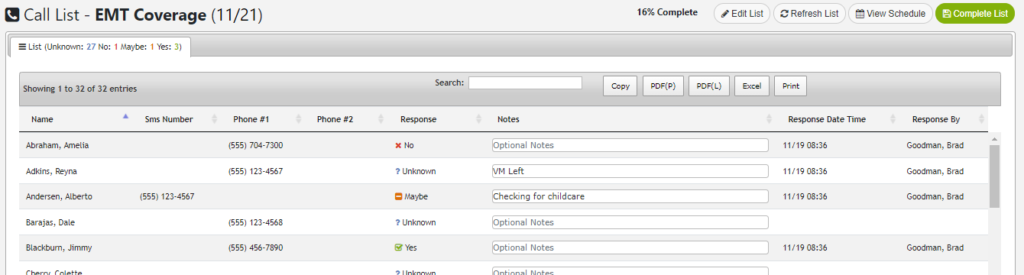
Select any call list from the Call List module to begin calling staff. Each users’ response will be “Unknown”. Once you have dialed a phone number for the employee, you can click the “Response” to toggle between “Maybe”, No”, “Unknown”, and “Yes”. Optionally, you can add a note such as Voicemail left or any detailed responses.
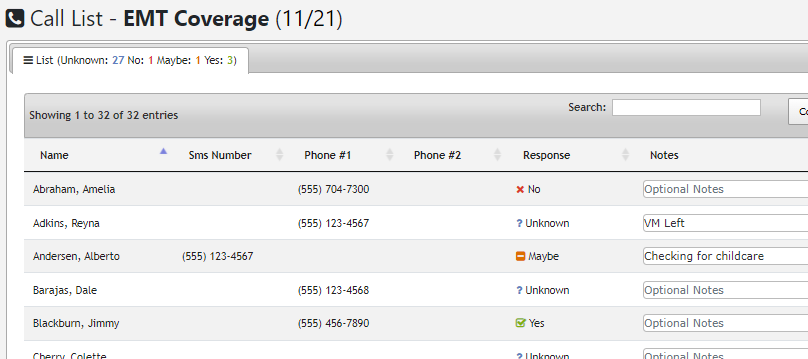
Once a “Yes” response has been obtained or the list has been exhausted, click the “Complete List” button in the top right hand corner.