

Newest Updates
iOps360 has recently completed a full re-write of the payroll system. You should immediately notice much faster calculations! Additionally, the standardization of our back-end code allows us to update or develop new features for Payroll more quickly. As a result, adding any custom exports, rules, or customizations that your organization needs will be much faster. Additionally, we can more easily integrate with many more payroll systems.
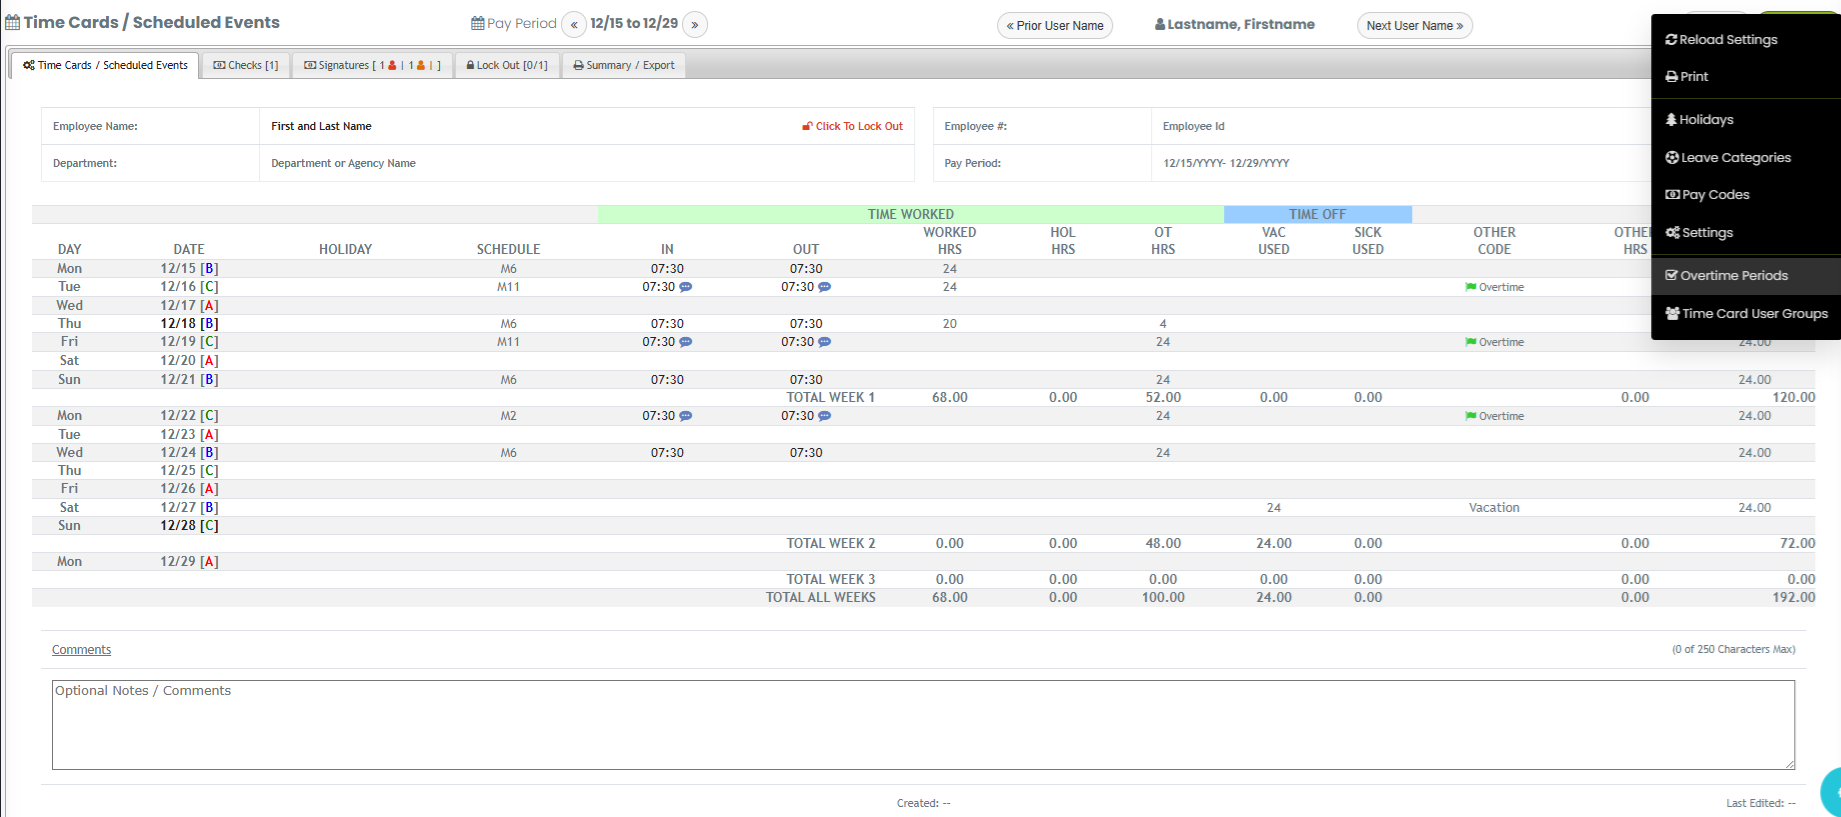
We have also added a number of useful features. Lock-out individual users/groups, edit events directly from the Time Cards page, improved printing, new print headers/footers, and several other tools that speed up your payroll verification process.
If your agency needs any custom rules, validations, exports, or changes, just drop us a line! We are glad to assist with any customizations you need. Keep reading for an overview of many of the payroll features and concepts.
What are Time Cards vs Time Stamps?
If payroll is generated based on shift start/end data from the schedule, iOps360 uses the term “Time Cards”. If payroll is instead generated from Time Stamps from the Clock In/Out feature, payroll is referred to as “Time Stamps”. Both formats function similarly, the only difference is the data that is used to generate hours totals.
There are several ways to know if you are looking at Time Stamps or Time Cards. The Payroll’s Page Title will use either term, indicating which data source you are currently using. Additionally, the “Schedule” column will show different data depending on which format you are using. Position Name is displayed when using Time Cards (Schedule), while scheduled times are displayed for Time Stamps (Clock In/Out).
Pay codes, Overtime thresholds, and all other settings will apply to both versions.
Running Payroll
To view or finalize payroll, click on Schedule > Time Cards / Time Stamps. Select the pay period and filter by cost center if needed. If any staff are missing, try changing the Cost Center filter to “All”.
Double click on any name to move that staff member to the selected users list. You can also highlight several names at once or click select all, followed by the Add Users button. Once all desired users have been selected, click the Generate button to display the Time Cards/Stamps for all selected personnel.
General Settings
There are many settings that you can customize for how payroll will be generated. Options include ignoring daylight saving time, rounding of times, splitting shifts at a specific time of day, and how to handle events that are crossing over a pay period end.
The hard stop at the end of a pay period setting will crop any user hours at the end of the pay period time. If a user works over this time then the remaining hours will be shown on the next pay period. Agencies where all hours are counted on the starting date should leave the hard stop turned off.
Overtime Calculations
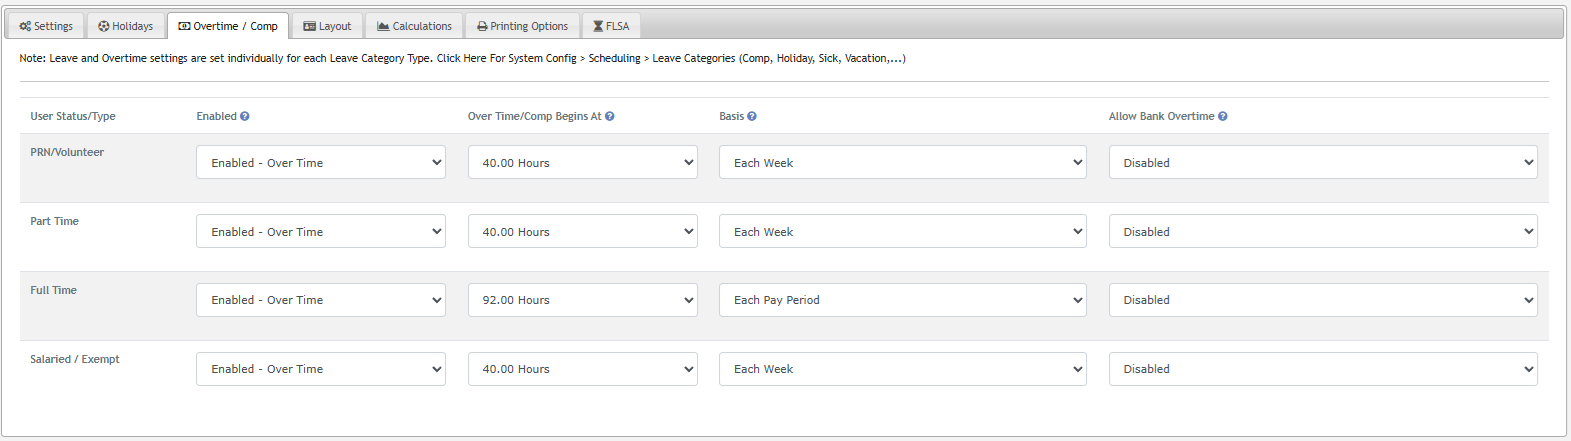
There are many different ways to calculate overtime for individuals. Rules can be based upon the user status such as part time full time and salaried. For customizations on a user level there are additional options as well. Users can be assigned to an overtime group which has rules that will supersede the status rules.
Overtime can be calculated weekly, by pay period, and monthly. Additionally, overtime periods allow for further customization, such as day of the week for the start of the pay week. FLSA rules can also be utilized as well. In the case of a 14 day pay period with a 28 day cycle, we can “look back” at the prior pay period and carry those hours into the OT amounts.
Use the “Settings” quick link in the top right of the time card page. Or, navigate to: System Config > Time Cards > General Settings > Overtime Tab.
To customize rules for a specific person, navigate to their profile and click on Employment > Miscellaneous > Override OT/Comp Settings.
To assign rules to groups, use the “Overtime Periods” link in the top right of the Time Card Settings page. Or, navigate to: System Config > Time Cards > Overtime Periods.
Paycodes
Pay codes can be assigned when specific situations occur. Each agency will have pay codes for regular versus overtime, holidays, incentive codes and more. Each Pay Code can be tuned to override pay amounts, contribute towards overtime, be included in exports to payroll platforms, and more. Pay codes can also be limited based on user status and job title, ensuring correct use for desired personnel.
Each pay code has a name (used only for reference and readability), and two output codes. The first output code will be used for regular (non-overtime) pay, and the second applies once the user surpasses the overtime threshold. These codes can be the same or different depending on your needs. Each of these also has a multiplier that can modify the hours as needed (0.25x, 0.5x, 1.5x etc).
Each pay code will also have one or more usages that tell the system when to utilize this pay code. Usages can be tied to flags, incentives, days of the week, holidays, specific leave categories, leave hours types, positions, and more.
Use the “Paycodes” quick link in the top right of the Time Card Settings page. Or, navigate to System Config > Time Cards > Pay Codes.
Holidays
There are many different ways to handle Holidays and ensure the correct personnel are paid accordingly.

No holiday awards can occur if no Holiday pay codes have been defined. Always ensure a defined holiday code has been created for your organization.
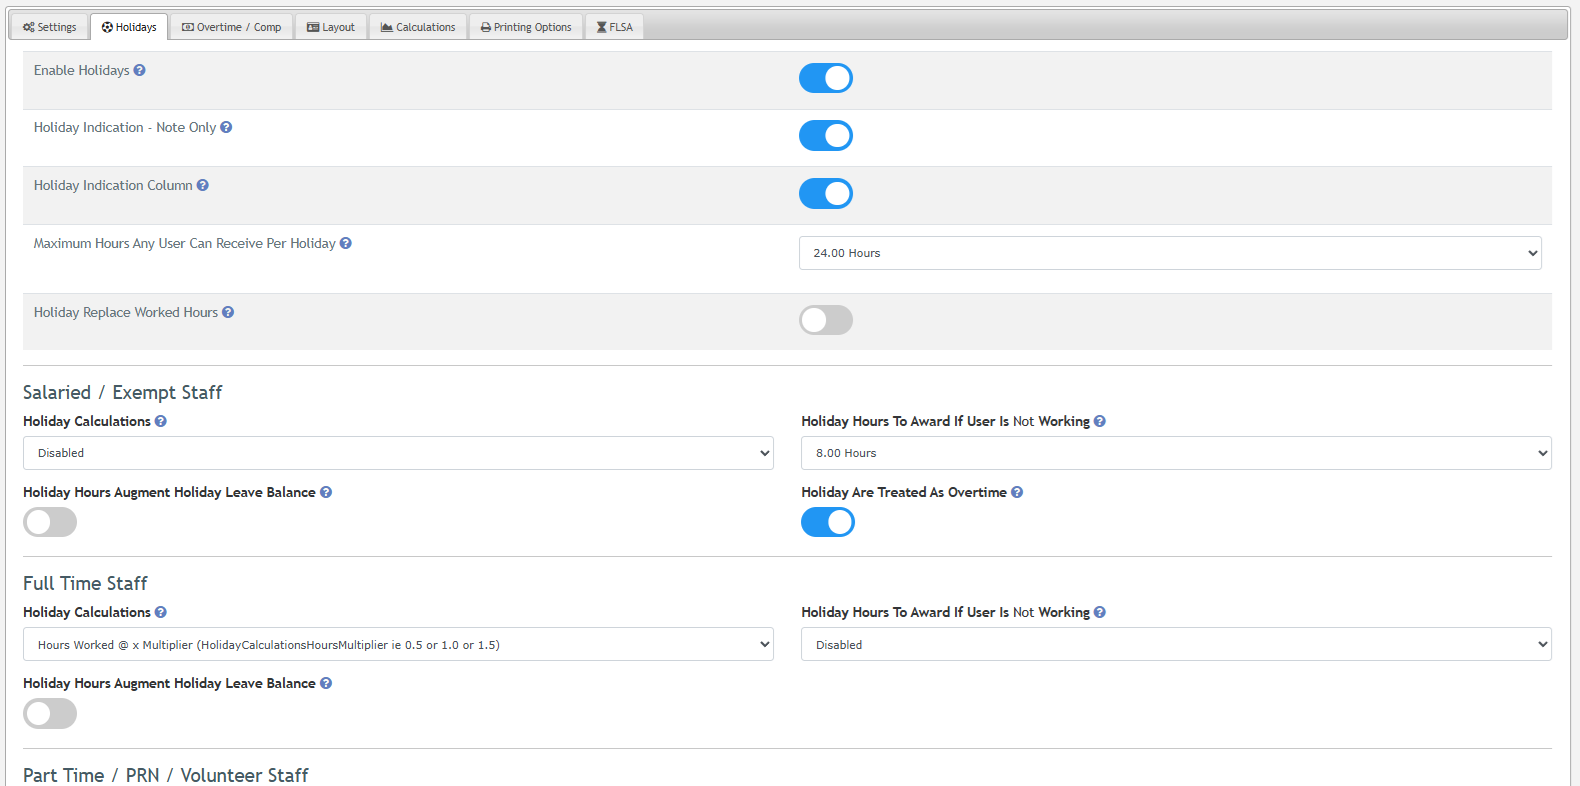
There can be multiple holiday codes for varying levels of staff in situations. The holiday calculations are broken down by Salaried, Full Time, and Part Time staff. This will let the system know that this should be a fractional amount such as hour-for-hour or other options such as a specific amount regardless of the amount of time they are working.
To augment the Leave Balance that is awarded into a user’s available time off banks when a holiday occurs, use the “Holiday hours to award if user is not working” setting (available in the Time Card settings page). This will allow you to set a specific amount of leave to award when no hours are physically worked.
You may also want to enable the “Holidays – Considered Working Hours” setting for your agency’s Holiday Leave Category (found in the Leave Categories setup page).
Some agencies prefer that a User working a holiday receives a specific Holiday pay code, instead of the regular one. To do this, enable the “Holidays replace worked hours” setting. This will tell the system to convert the shifts’ hours into holiday hours, which will then utilize that holiday’s pay code.
Use the “Settings” quick link in the top right of the time card page or System Config > Time Cards > General Settings > Holidays Tab.
Specific Holiday, Amounts and Dates
Next, you will need to define how each holiday will operate. Holidays must be created year to year since some Holiday dates will change. Each Holiday can be customized per occurrence as needed.
iOps360 recommends using the Quick Add feature for your agency’s yearly holidays. Start by navigating to: System Config > Time Cards > Holidays, and click “Create Suggested Holidays.” This will provide a list of common holidays, which you can add for your agency with the click of a button. Recommended Holidays will also include observed holidays when a holiday occurs on the weekend.
You can also select an instance from the list to edit that holiday’s hours multiplier, hours amount awarded, and many other specific settings for that holiday.
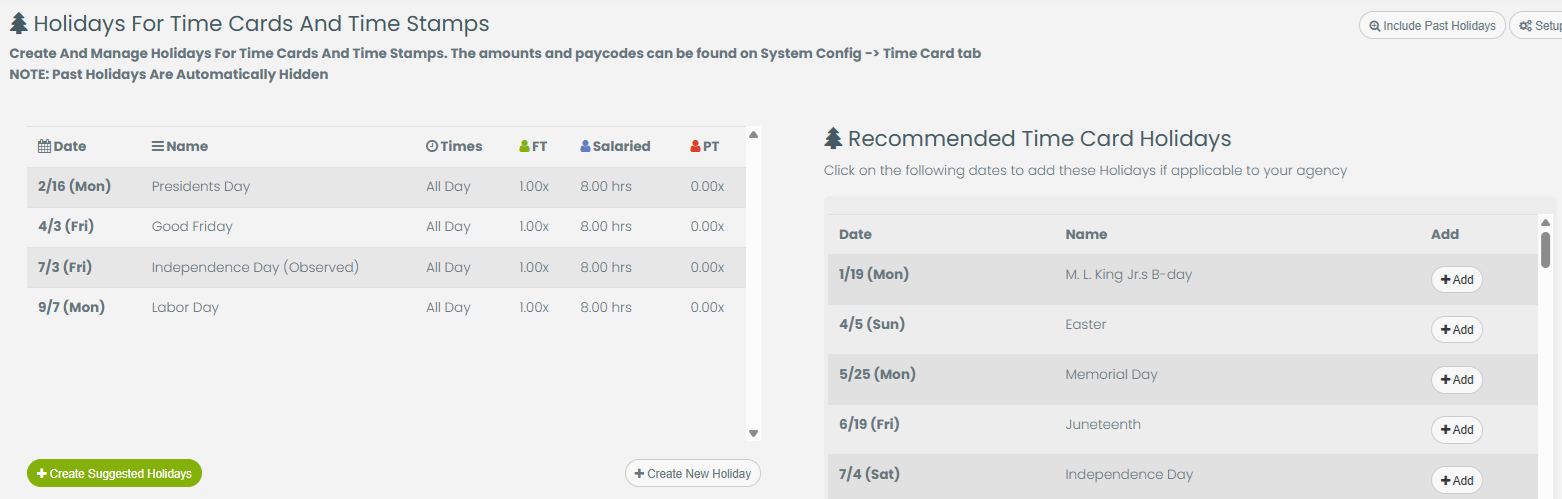
In the example above, these holidays have been defined as an “all day” event which operates from midnight to midnight. The start and end times of all day holidays can also be customized, (e.g. 7:00 AM – 7:00 AM). Full Time staff are set up on a multiplier awarding one hour for every hour worked, while salaried staff receive a flat 8 hours per holiday.
These settings can be customized between holidays and can extend to part time staff if needed. You can add additional custom holidays without using the suggested holiday list by clicking the “Create New Holiday” button.
To locate this page, use the “Holidays” quick link button in the top right of the “Time Card Settings” page or navigate to System Config > Time Cards > Holidays.
Leave categories
When staff requests time off, they will select the Category (and Hours Type if using a deducting Category). Typical non-deducting Leave Categories include cases like administrative or bereavement leave, where the user’s leave should not deduct from any maximums or balances.
Pay codes can be also be triggered by Leave Category and/or by the Leave Hours bank. Additionally you can also set if a Leave Category counts towards overtime thresholds or applies as working hours towards holidays.
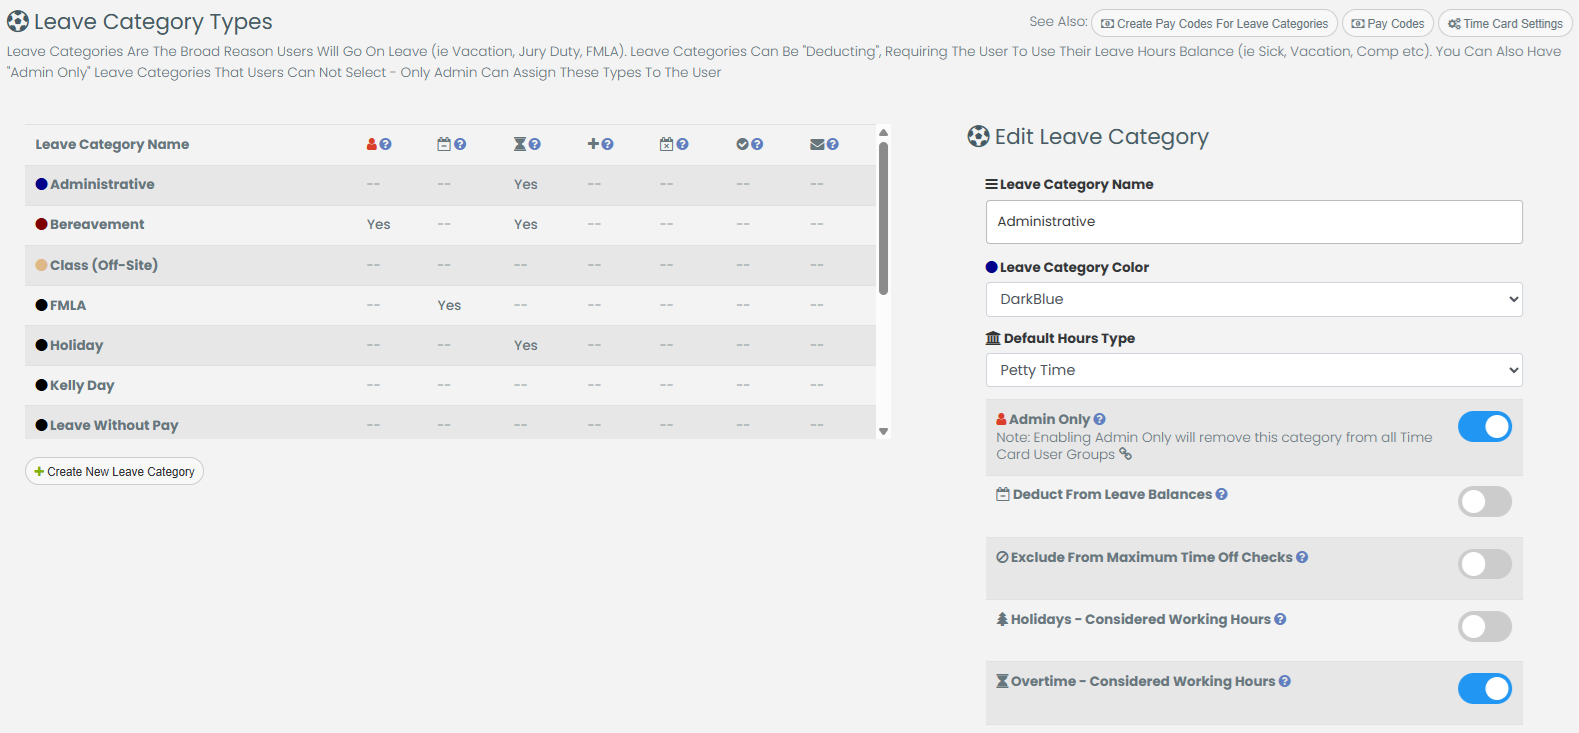
Use the “Leave Categories” quick link in the top right of the time card page or navigate to System Config > Scheduling > Leave Categories.
If a leave pay code is not shown in the time cards ensure that the leave category used has not been excluded from the time cards. Also check that the pay code matches that leave category. Some pay codes can also be restricted from the time card page and ensure that this is not set for that pay code
Is a Leave Category counting as worked hours / triggering an overtime threshold when it should not be? Select “Leave Categories” from the quick links in the top right of the Time Card Settings page, and ensure that the Leave Category is not set as contributing to worked hours.
Signatures
Employees and up to two supervisor signatures are available. This can be customized in System Config > Time Cards > Settings. You can rename the signatures and decide how many should be visible. Staff can then quickly click sign their timecard to record the date, time, and IP address of the signature.
Supervisors and additional admin staff can quickly cosign many time cards at once from the Signatures tab.
Lock out
Once changes have been made for a pay period, you can lock a specific user or all staff. Lock-outs will award relevant leave hours to the selected staff and prevent further changes, only for this pay period.
If necessary, Time Cards can be unlocked. Unlocking Time Cards for one or more staff will undo any hours awarded and once again allow for edits.
Payroll exports
There are many different payroll export options available. Contact your representative to enable an export to any platform. Many integrations are fully server to server, allowing for iOps360 to automatically transfer payroll data directly to your provider. Otherwise, you can export a CSV (Excel) file with data formatted uniquely for your payroll provider, allowing for easy importing.
If your desired payroll provider is not currently available in iOps360, please let us know. iOps360 constantly adds additional export options, and we would love to add yours!
Note that Payroll exports and lock-outs can still be performed even if some staff have not signed their time cards.
Customizations
iOps360 can also quickly add payroll customizations for your organization!
Common customizations include: Checks and balances when certain situations occur, maximum hours worked per week alerts, overtime generation by leave, and lots more.
We have flexibility on layout as well, so feel free to reach out to your support representative for any customizations your agency may need.