

The iOps360 survey feature allows you to quickly sample the team on any topic including evaluation of new equipment, ideas for education topics, and more. You can target specific staff by User Role and by the individual user with the option to keep the results anonymous.
Creating A Survey
From the “Features” menu, click on “Surveys“. If the module is not enabled, you can do so in “System Config” -> “General” -> “Modules“.
The Survey search will appear and click “Create New Survey“.
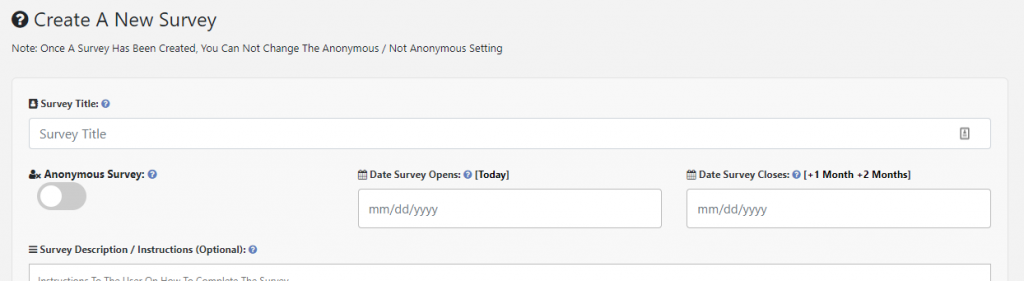
- Survey Title: The title of the survey.
- Anonymous Survey: Determine if the survey will be Anonymous, excluding staff names from the responses. Once this is set, it can not be changed.
- Date Survey Opens / Closes: Set the dates that the survey will be available to users. Once the survey closes, no additional responses will be accepted.
- Survey Description: Detailed instructions for the team on how to fill out the survey and clarification of any concepts.
- Open To User Roles: Select the User Roles that the survey will target. If no User Roles are selected, the survey will be available to all staff.
- Open To Specific Users: If User Roles are selected you can include additional team members. If no user roles are selected, all staff are automatically included.
- Completion Message / Thank You: Message presented to staff once the survey has been completed. If users should print the confirmation page as proof of completion for an anonymous survey, this can be included.
Adding Questions To A Survey
You can add as many questions to a survey as needed. From the Survey View page, click on the “Questions” tab. Click “Add Question” to add a new question to the survey.
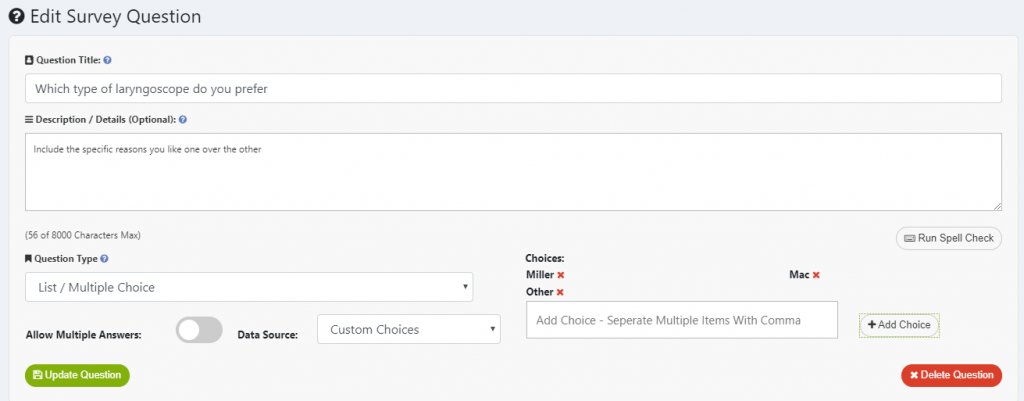
- Question Title: The question to be answered.
- Description / Details: Optional text to be shown below the question including more detailed information
- Question Type: Select from a variety of question types such as Dates, Numbers, Lists, and Text responses. Lists can be allowed to have multiple answers as well as be linked to Data Source. Data Sources will pre-fill a list with Active Users, Shift Letters, Yes/No, Truck Ids, Class Types, and many more. To create your own list, select “Custom Choices” in the Data Source list. Choices can be added to the custom list in the “Add Choice” list. Multiple items can be added at one time by placing a comma between each choice.
Filling Out A Survey

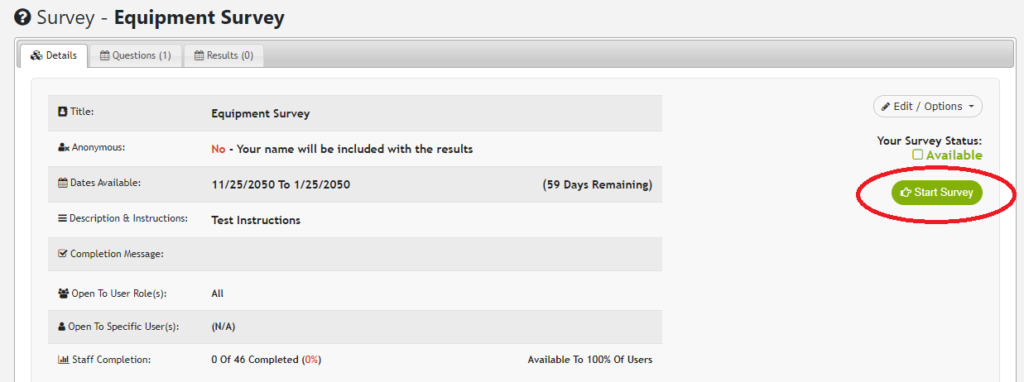
From the Survey search page, click on any Survey. When you are ready to start a survey click “Start Survey” on the right. Once a survey has been completed or if the survey is not available to the user, the “Start Survey” button will be hidden and a status message shown instead.
All answers will be saved in real-time, allowing users to start and stop the survey as needed. Users will see the “Descriptions & Instructions” information when starting the survey (if provided).

Once all answers have been completed, the survey will end and the user will be shown the “Completion Message / Thank You” page.
Survey Results

Survey administrators will be able to view the survey results. Click on the Survey from the Search page, followed by the “Results” tab.
Each question will be listed with the aggregated responses. Text-type questions will have each answer shown since these can not be aggregated. Large lists that are linked to a Data Source will only have answers shown that were picked. Smaller lists will show all options, even if not selected by a user.
Helpful features
Several options are listed under the “Edit / Options” menu for Survey Administrators. The “Duplicate Survey” feature will create a new survey, along with all questions and settings to a new survey. This is useful for a Pre and Post survey when implementing a new change. “Notify Staff That Have Not Completed the Survey” will send a message to all users that have not yet completed the survey.
Have an idea to help make iOps360 better, we would love to know! Contact any of the iOps360 team members and keep the great ideas coming!