
The Non-Emergency Transport Module allows you to schedule transports, patients, point of contacts, and more into an easy to use scheduler. Transports can be quickly assigned to units and sent notifications when transports are about to begin.
Transport Demographics
Each transport can have a variety of fields such as sending and receiving facilities, bed/floor/apt/unit numbers, point of contacts, status code, level of care, and units assigned. The sending and receiving facilities can be any known location including hospitals, nursing homes, airports, etc. as well as addresses when returning patients home. Level of care can be customized to your agency needs, along with activities and forms needed for each transport.
App Featured
Users have quick access of important detailed information, upcoming transports, information on patient, and contact information. Users are able to record their on-scene times to the cloud for live feedback for Supervisors to access.

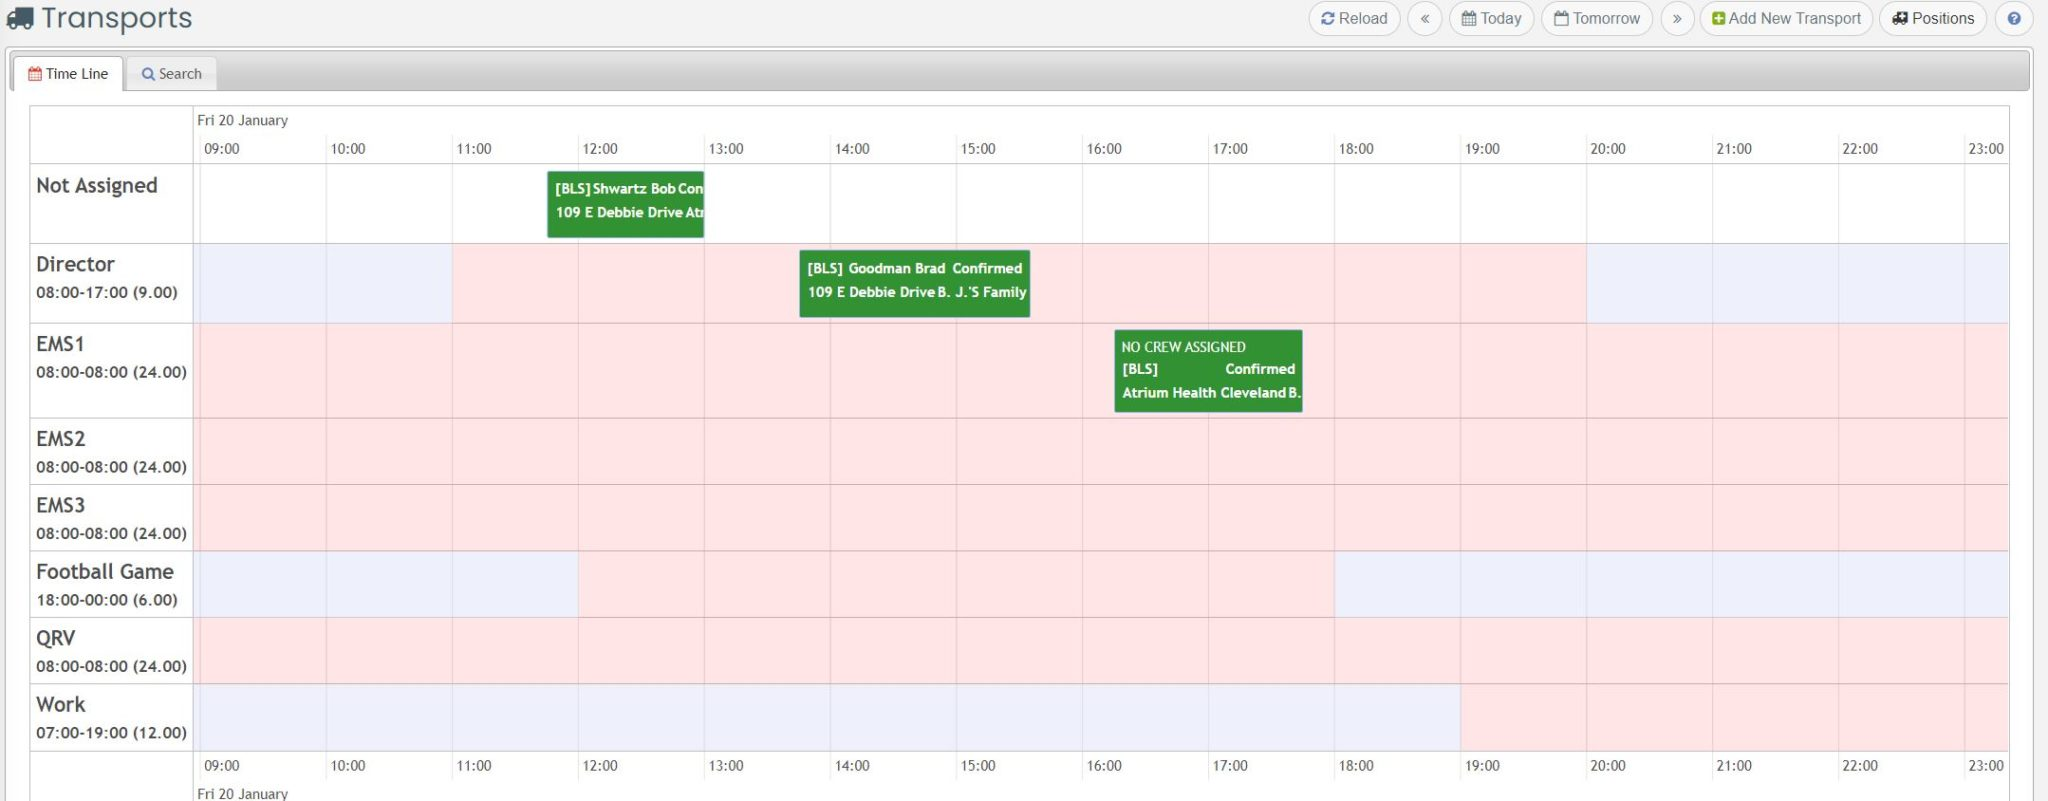
Transport Time Line
The timeline allows you to see a visual representation of the day and modify transports through out the day as events change. The timeline view will show the transport level of care, patient name, transport status and locations. Hovering over any transport will show additional details.

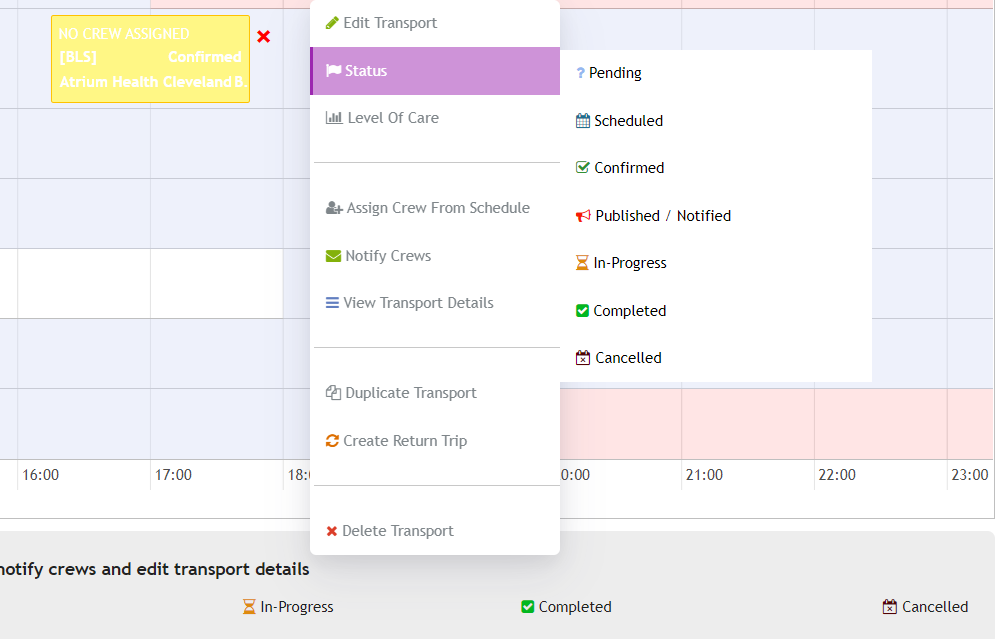
Click on any transport to select it. Once selected, you can drag and drop the transport to another time slot and/or another unit. Right-clicking on any transport will open the options menu to display a variety of options.
Crew Assignments
When transports are created, a unit can be assigned or left blank until the day is planned out. Once the transport is dragged from the “Not Assigned” category to a specific unit, the system will automatically assign the staff members working during that time frame. This will allow the crew members to see the transport details and prepare for the transport. If no crews have been assigned, the system will automatically assign staff when the transport reminders are sent out.
Transport Reminders
Transports can have reminders sent via email, app, and sms to ensure crews are aware of the upcoming transport. Each transport can customize the heads up reminder time from 15 minutes to 2 hours. This will ensure crews have enough time to prepare and arrive at the sending facility in time.
Transport Editing
From the search page or the timeline, you can edit the transport. Using the search page, simply click on the transport. From the timeline, right click on the event and select “Edit Transport”.
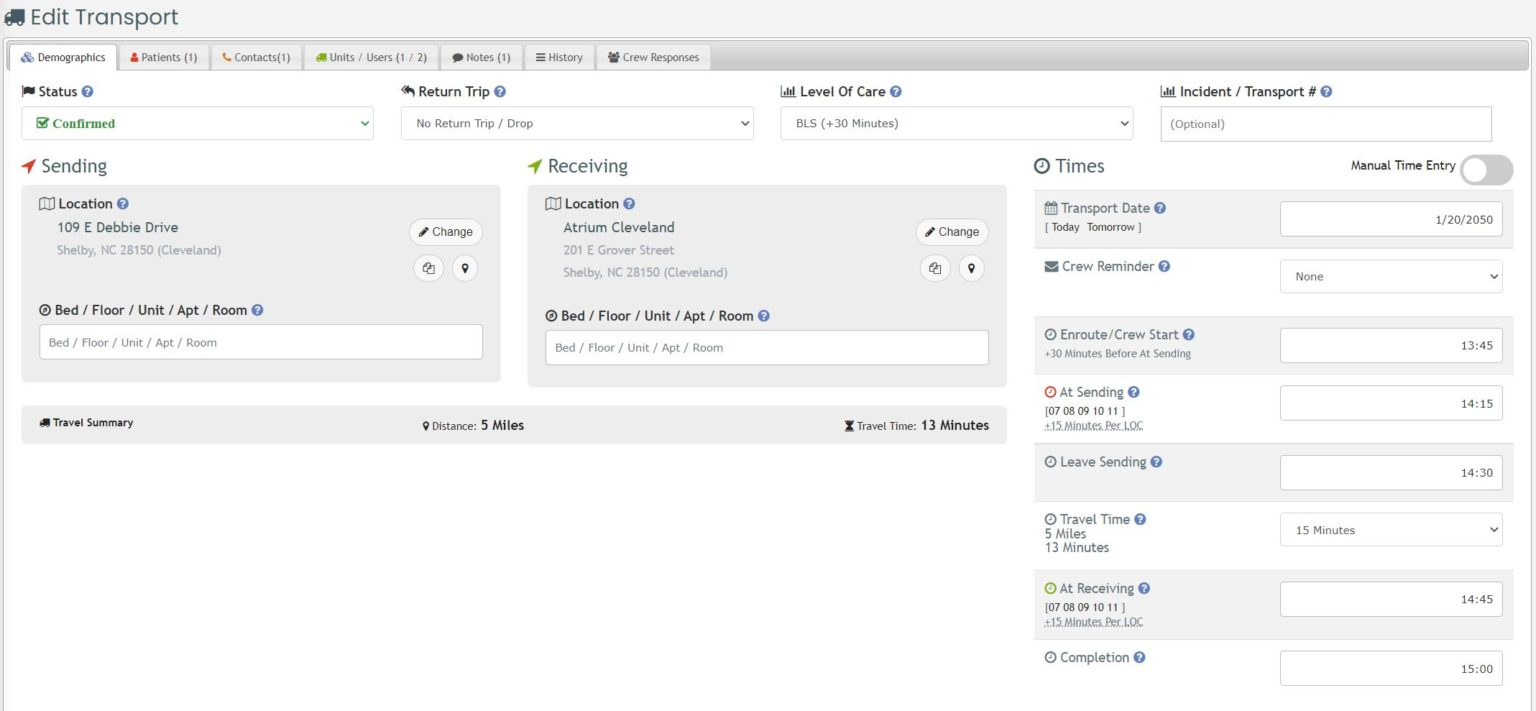
Transports are broken down into several tabs include Demographics, Patients, Contacts, Units/Users, Notes and History.
The Demographics page contains basic information such as sending and receiving facilities, level of care, bed assignments, and transport status.
The Patients tab contains a patient database specific to your organization including name and date of birth.
The Contacts tab contains names and phone numbers to people organizing the transport such as nurses and social workers.
The Units/Users tabs allows for quickly assigning units to the transport. You can assign users to transports but iOps360 will assign users from the schedule if they are not filled in.
The Notes tab allows for any additional information to be added with an option to include this information in the crew reminders.
Crew Reminders
iOps360 can send a reminder to users assigned prior to the sending bedside time. The reminder will include the locations, bed assignments, times, and designated notes from the notes tab. Patient information is not included in the reminders but a link to the transport is. Crew members needing the patient information can quickly click on the link to obtain patient demographics.
Transport Requests
Transports can be requested from the general public, hospital staff and other un-authenticated users. To use this features, you can create one customized link for each agency and distribute the link or a PDF flier with a QR Code for quick access. Once the transport request is received, staff will be notified to approve the transport request and the transport will be added to the timeline.
Creating an agency request link

Navigate to System Config -> Transports -> Transport Login
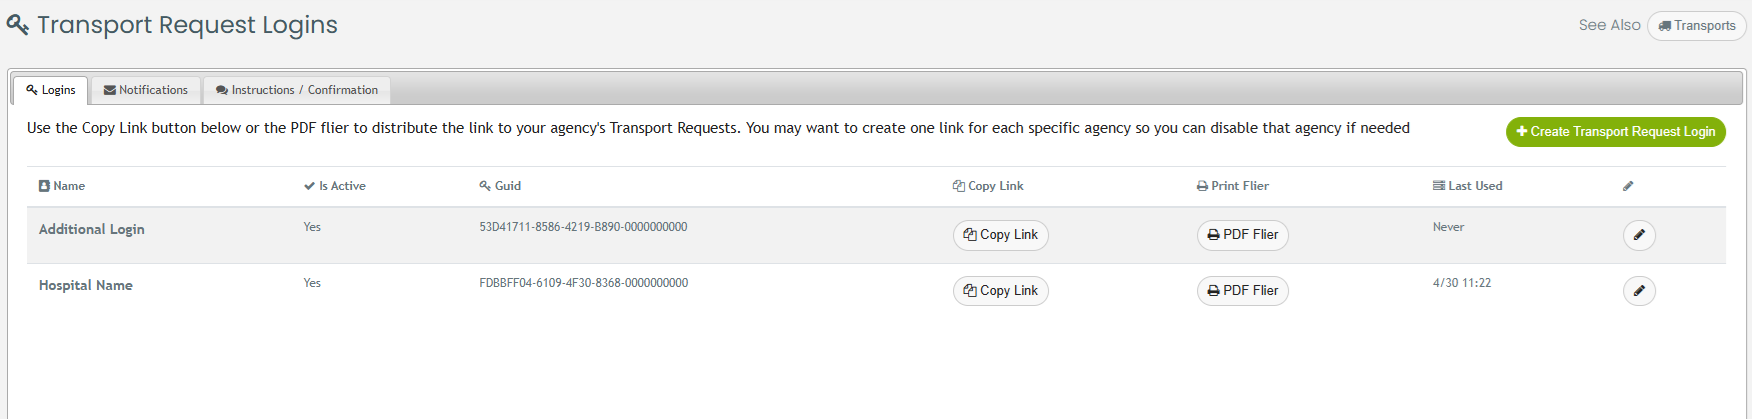
Click on the Green “Create Transport Request Login” and give the login a name, You can create one per agency to see utilization and filter transport requests later. Once created, click “Copy Link” and distribute to the organization or click “PDF Flier” to generate a QR Code for quick access using a mobile device. Click the Copy Link button and paste into your browser to fill out a sample request.
Notifications
Click on the “Notifications” tab to setup who should be notified when a new transport request is received. This can be a specific person or person working on a position with specified times and days of the week. If no notification is selected or found, iOps will automatically notify all users with the Transport Admin permission. If no users are found with the Transport Admin permission, the SysOp permission staff will be notified instead.
Instructions / Confirmation
You can provide customized instructions to people filling out the Transport Request and also a customized completion message. Include any details to clarify the needs of your organization and which transports should Not be requested through this portal (Such as 911 Emergencies). The confirmation message should include instructions on how to contact the transport coordinator for after hours or time sensitive transports. If for any reason staff do not respond to the transport request, this will ensure the requestor has a phone number to contact you. Depending on your agency’s legal requirements, additional verbiage can be placed here such as Contact 911 for an immediate need.
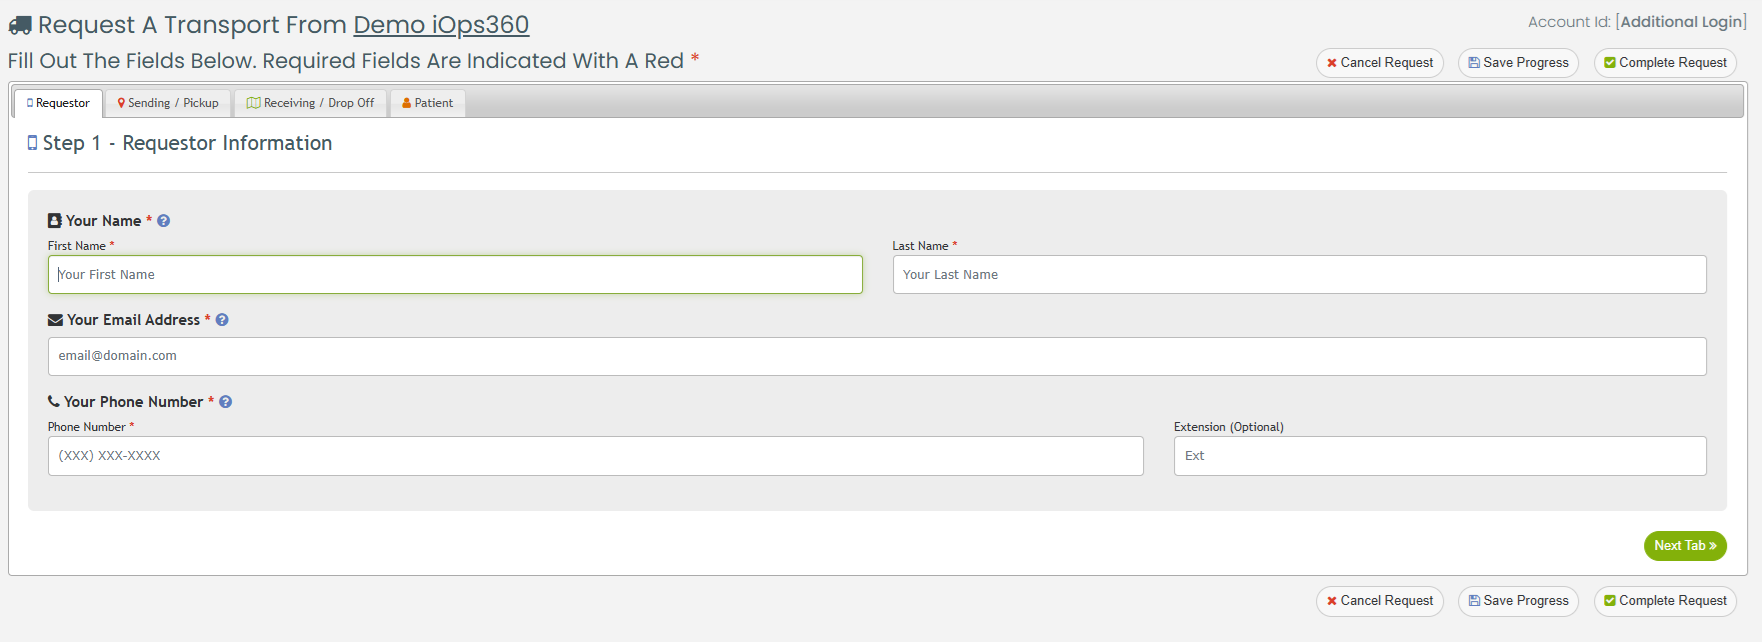
Requesting A Transport
Using the link you created above, paste this into your browser or scan the QR Code in the PDF Flier.
The request is broken down into 4 tabs. The first tab will collect information from the requestor. Contact information is required to be able to quickly clarify any transport questions. The request for will save for 24 hours on the user’s computer. Click Save Progress to save the request if you need to pause the request. If a saved request is located, you will have a prompt to Resume that request. Since we can not guarantee the same requestor is resuming the request, the patient name will not be saved if resumed.
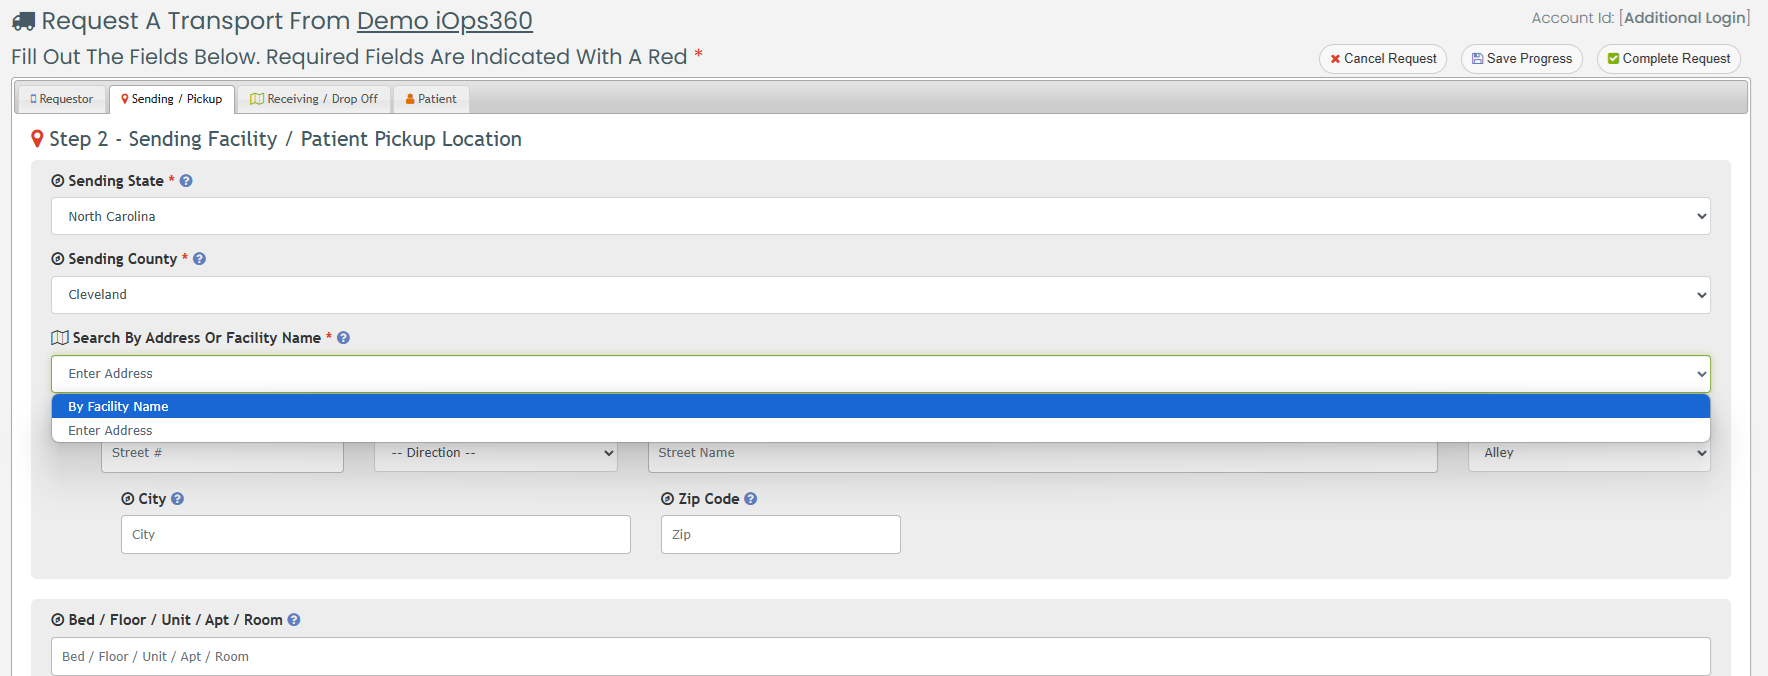
The Sending and Receiving tabs will collect the facility name or address of the transport. The State and County will default to the agency’s location. Select By Facility or Enter Address to toggle between manually entering an address and the list of facilities in the selected County and State. If the facility is not found with the autocomplete, ensure the correct County is selected. If the facility is not in our database, just let us know or utilize the address portion. Lastly, enter the optional Bed/Floor etc to ensure staff can locate the patient quickly.
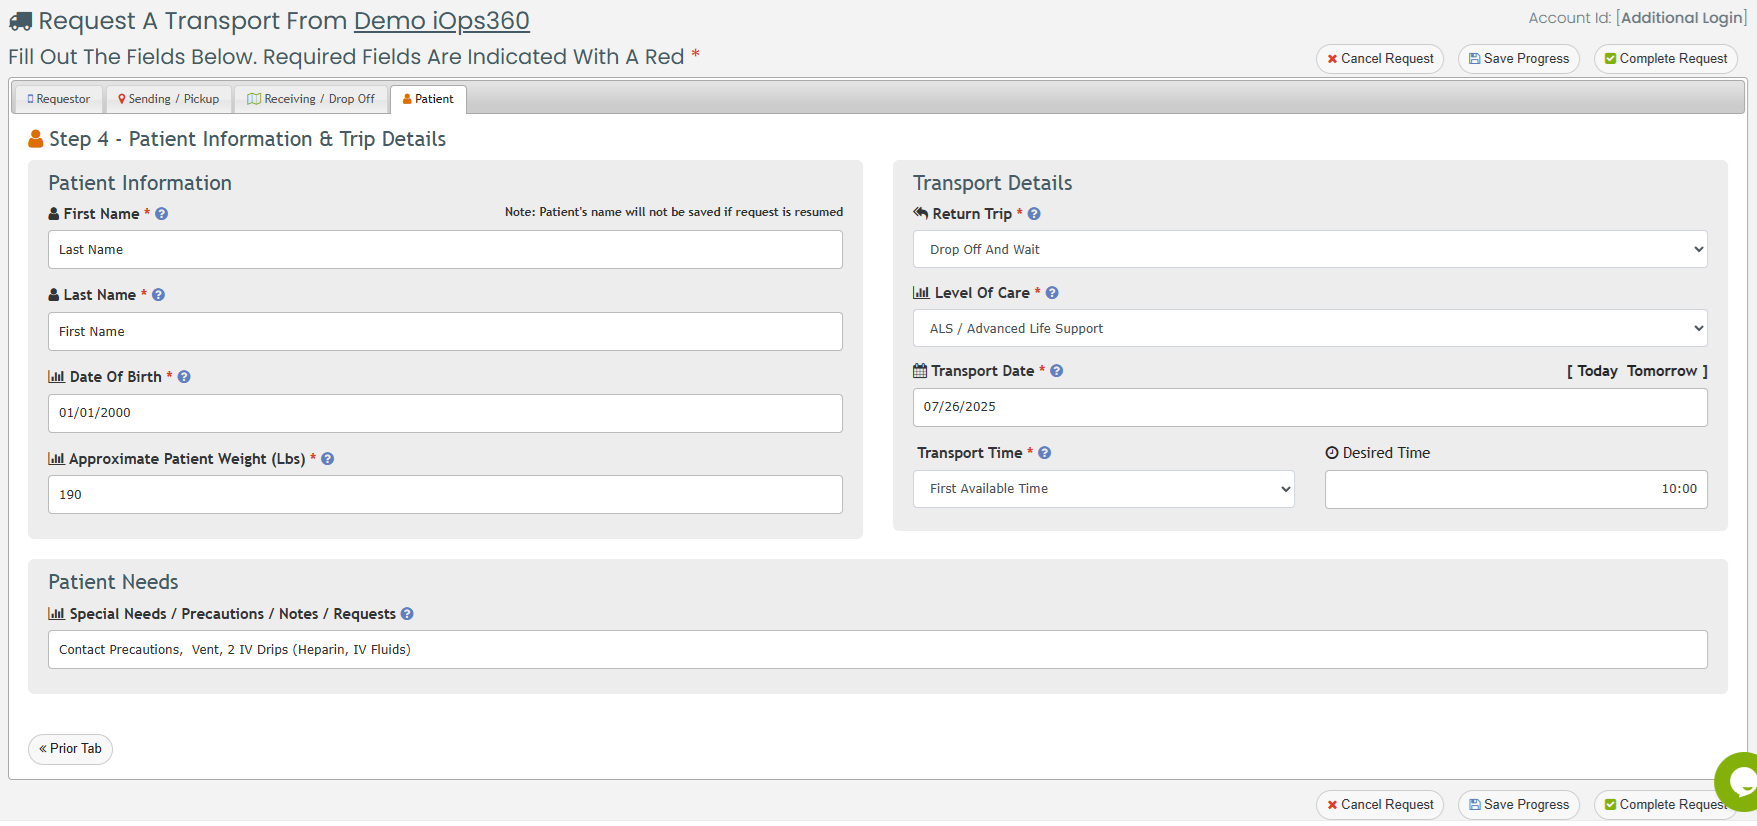
Once the sending and receiving locations are set, complete the request by filling out the patient information and other transport details such as level of care, dates, and return trip needs. Enter any special information in the Patient Needs section including equipment needed, and special precautions.
Once all the fields have been completed, click “Complete Request” and proceed through the verification page. Agency staff will be notified and contact you to coordinate the transport. If the agency does not contact you quickly, please contact them directly to ensure timely pickup.
Transport Request Approval
Once notified, you can approve or deny a transport request by clicking on Transports and the “Requests” tabs. The search will default to “Not Reviewed” requests. Use the filters to click on any request.
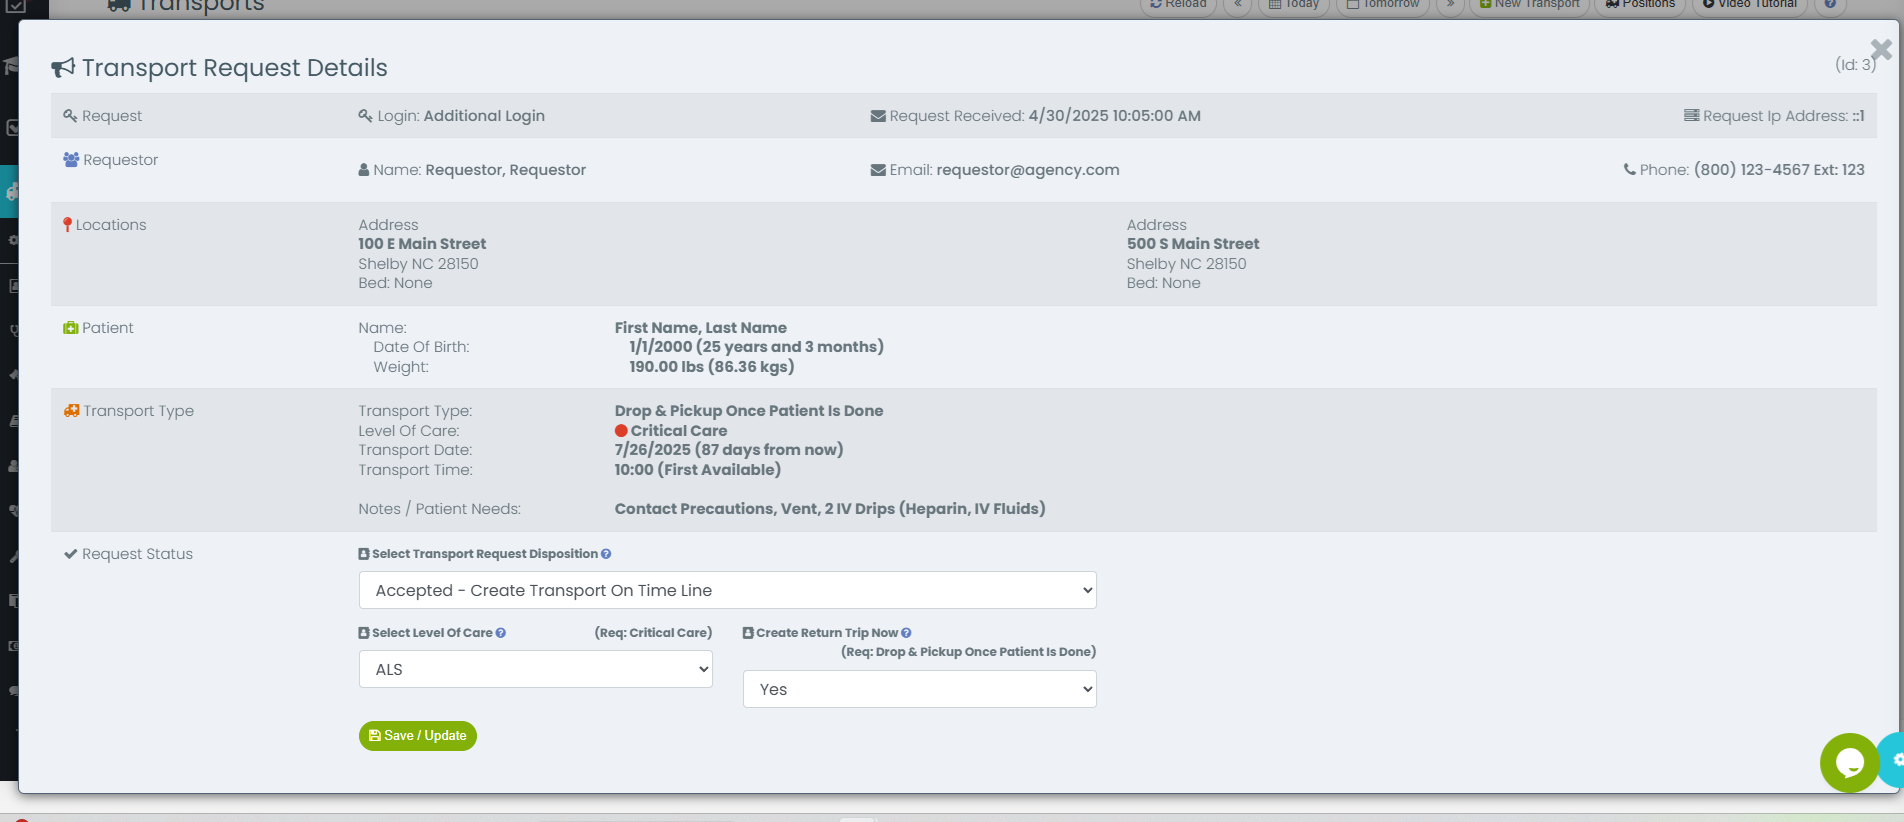
To approve or deny the request, change the Status/Disposition at the bottom of the form. If the transport is being approved, it will prompt you for the agency specific level of care and also if a return trip should be created. The requestor might have picked one level of care while your agency considers it another due to patient size, equipment needed or other factors. Once approved, the transport will show on the timeline.
If the transport is approved, you can navigate back to Requests and deny it if needed. This will remove the associated transport. If the request was denied, you can change the disposition back to Accepted to create the transport.
IMPORTANT: If denying a transport, you will need to contact the requestor by email or phone. iOps does not email the requestor since additional details or logistics may need to be discussed with why the transport was declined.
HIPAA Protections
Patient information is limited to name and date of birth. Depending on your facilities protocols on Hipaa, you can choose to not utilize the patient tab. All patient information is encrypted and only available to users that are directly assigned to the transport and/or users with Supervisor access and above. Staff members are able to see all of the transports but no patient information.