Self Scheduling Setup
Several pieces must be configured to allow Self Sign Up to work correctly:
Self Scheduling Setup:
The self scheduling setup allows you to setup the general operation of the module.
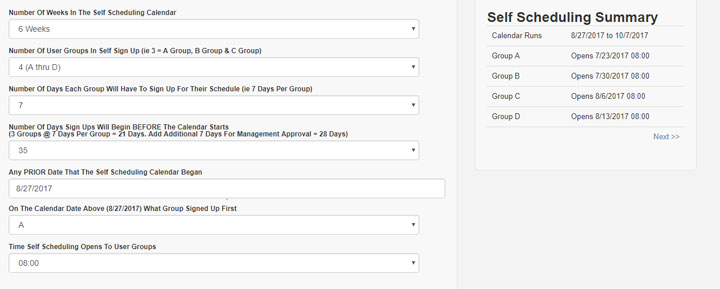
Click on “Features” -> “System Configuration” -> “Self Scheduling” tab.
Click “Self Scheduling Setup“.
Number Of Weeks In The Self Schedule Calendar – Select how many weeks you want users to sign up for at one time. Typically this will run 4 or 6 weeks at a time. Note, this does not run one calendar month at a time which the scheduler typically runs. In this situation, you simply create the traditional calendar for 2 months to create the holes necessary for users to sign up.
Number Of User Groups In Self Sign Up – The Self Schedule feature can have from one to ten self sign up groups. Each user will be assigned to a group. When the time occurs for the Group to sign up, all users in this group will be able to. The allotted time for the group sign up will end and the next group will open for sign up. If Group B goes first this calendar, then Group C will go first next calendar.
Number Of Days Each Group Will Have To Sign Up For Their Schedule – Enter the number of days each group will have to sign up. Typically 7 days for simplicity.
Number Of Days Sign Ups Will Begin BEFORE The Calendar Starts – This will determine the amount of time the management team has to review and make changes to the calendar. If you have 4 Groups and each group has 7 days to sign up, then 4 * 7 = 28 days. If the management team needs 7 days to review and make changes, then sign up should being 28 + 7 = 35 days. If the management team needs 14 days to review and make changes, then select 42 days.
Any Prior Date That The Self Scheduling Calendar Began – Enter any date that the self schedule started. This will tell the scheduler when a prior self schedule opened and it will add the Number Of Weeks from above to determine when the current self schedule will begin. If you don’t have a prior self schedule then determine the day you want self scheduling to begin and subtract the Number Of Weeks In The Self Schedule Calendar (from above) from this date. Ensure this date is in the past.
On The Calendar Date Above (mm/dd/yyyy) What Group Signed Up First – This tells the scheduler which group went first on the day you specified above. The scheduler will do the math to determine which Group will start the upcoming calendar.
Time Self Scheduling Opens To User Groups – Enter the time in hh:mm format of when you want users to be able to sign up. Ie 19:00 = 7 pm.
Self Scheduling Summary
The self scheduling summary will automatically update as you change the values above. This will show you the current self sign up schedule and when each group will open. If any values are in-correct, review your settings as necessary. To see the Next Months’ configuration, click the “Next” button.
Next, We need to assign users to each of the Groups.
Click on “Features” -> “System Configuration” -> “Self Scheduling” tab.
Click “Groups & Users“.
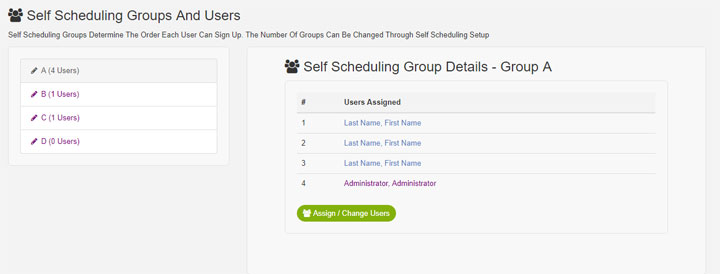
Click on the Group A and click “Assign / Change Users” button in the right window. A popup will appear and check the checkbox next to each person that you want assigned to this Group. Click “Update Group Assignments” to save changes.
Then repeat this set for each User Group. If you need additional user groups, change the “Number Of User Groups” from the Self Scheduling Setup page.
Note: You can also change user’s Self Scheduling Group directly from each user’s profile page.
Next, We need to assign which units are available for Self Scheduling. (ie Users should not be able to Sign Up for the Director position)
Click on “Features” -> “System Configuration” -> “Self Scheduling” tab.
Click “Units Enabled For Self Scheduling“.
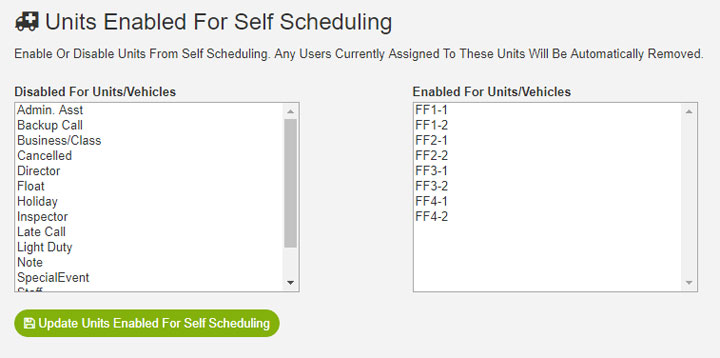
Click on the units from the left hand side to move the units to the right side. All units on the right side will be enabled for self scheduling. You should enable all units here that will be used in self scheduling. The specific Requirement lists for each user can further limit the units that a specific person/groups of people can sign up for.
Note: When the regular calendar is created, these units will be staffed automatically with open holes and any users assigned to these units will not be staffed.
Note: If you want self scheduling for 12 hours but the unit covered for 24 hours, you should have two units: 1 for day time and 1 for night time. If the self scheduling is for 24 hours and the user signs up for 24 hours, then only 1 unit is recommended.
Next, we will create the Requirement Lists.
Requirement lists allow you to require that users meet certain benchmarks (ie weekend requirements) and also allow users to sign up on only specific units.
Note: Each user can only be assigned one requirement list.
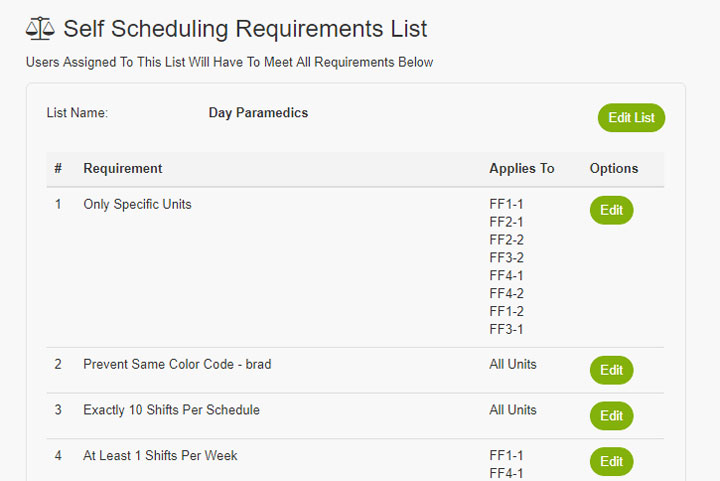
Think about each different user in your system that will be using self scheduling. Consider Day Shift vs Night shift. Consider users that can work on most units but perhaps not all units. The Requirement lists allow you to create rules to ensure that each of these users can only sign up for their correct units.
Click on “Features” -> “System Configuration” -> “Self Scheduling” tab.
Click “Requirement Lists For Users“.
Click “Create A Self Schedule Requirement List”.
Decide on the name of this group. Consider something like “Day Paramedics”. This title will help you decide when assigning a user to the list.
Click “Create Self Schedule Requirement List“.
Once the list has been created (or selected) the details will be shown on the right.
To change the name of the Requirement List click “Edit List“.
Next, we will add Requirements, click “Add New Requirement“. You can add as many requirements to each list as needed.
Select the Requirement Type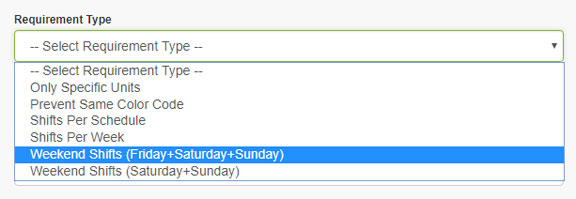
Select the Requirement Comparison 
Select the Requirement Quantity.
To limit the Requirement to only a specific Unit or Units, click the name of each unit in the Available Units/Vehicles list to move the unit into the Applies Only To Units/Vehicles list.
Example: If you want the “Day Paramedics” requirement list to allow users to only work on “-1” units, then select the Requirement Type as “Only Specific Units”. Notice that Requirement Comparison and Requirement Quantity disappear. Then select the units from the list below.
Example: If you want to ensure two new users do not sign up together, you can do this by creating a “User Color Code” called “New Employee”. Assign this user color code to each user that meets this criteria in their user profile. Next, create a requirement that uses the Requirement Type of “Prevent Same Color Code” and select “New Employee” from the list of available color codes. You can further limit this to specific units if needed. (ie Two new people should be prevented from working on EMS1, but EMS 2-4 are ok.)
Repeat adding Requirements as needed. A Requirement of “Shifts Per Schedule” OR “Shifts Per Week” should be added to ensure users sign up for every week. Time Off Requests in this time period will still show a flag for the user stating that they have not met all requirements. This is to be expected and will not prevent the user from signing up for all other shifts.
Once all Requirements have been added and all Requirement Lists created, Requirement lists should be added to each user.
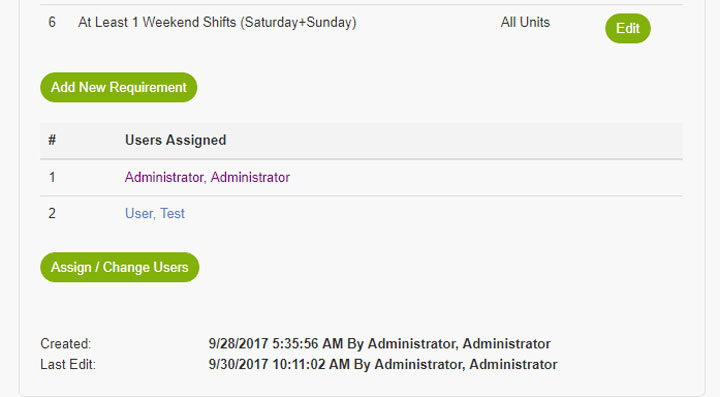
Click on the Self Schedule Requirement List and click “Assign / Change Users” button in the right window. A popup will appear and check the checkbox next to each person that you want assigned to this Group. Click “Update Requirement List Assignments” to save changes.
This guide has shown you how to configure the Self Scheduling features, create and assign users to the Self Sign Up Groups, enabled self sign up for the units, and create & assign Requirement lists. If you have any questions on self scheduling, review additional information from the help guide at
