Blood Module – User Guide
The Blood Module helps you track blood products (PRBCs, Whole Blood and Liquid Plasma) from intake through administration, return, or disposal. It monitors storage temperatures, generates alerts for issues, and maintains a complete chain-of-custody record. Manual temperature documentation and several automatic temperature platforms are included also.
Getting Started
Accessing the Module: Navigate to Blood Dashboard from the main menu. If the module is disabled for your agency, contact your system administrator.
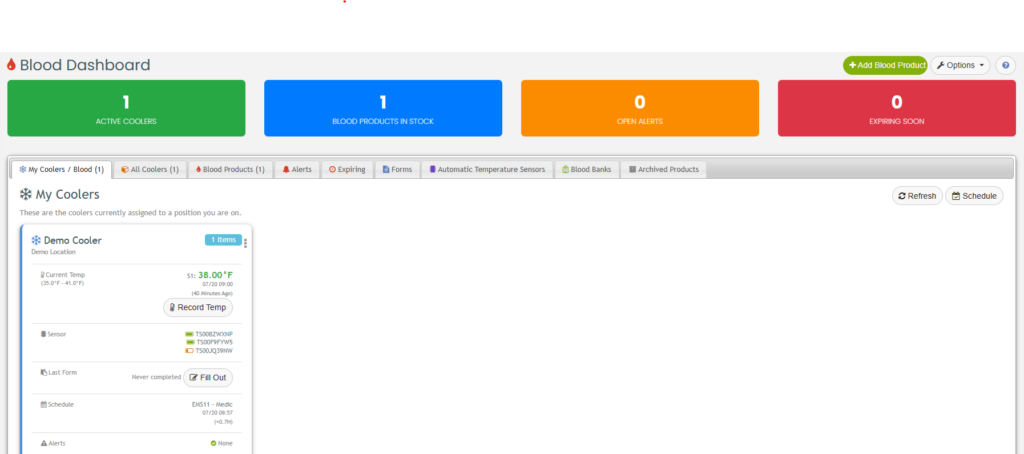
Dashboard Overview – The landing page displays:
- Active Coolers – Count of currently active storage units
- Active Products – Count of blood products currently in storage
- Open Alerts – Unacknowledged temperature or expiry warnings
- Expiring Soon – Products approaching their expiration date
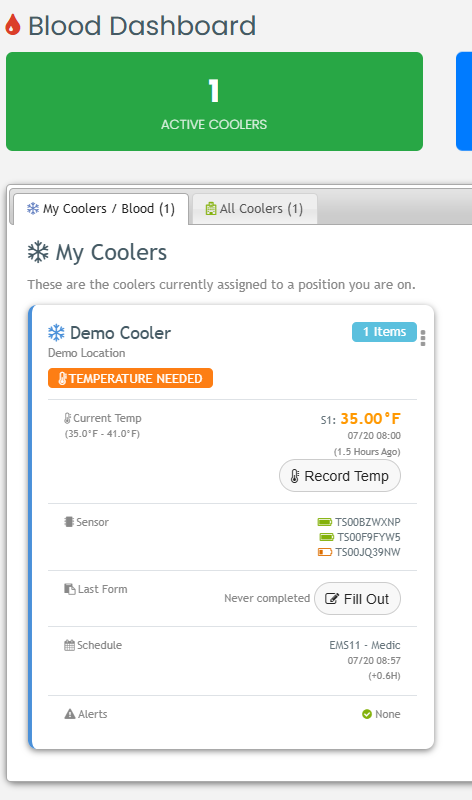
- My Coolers – Cooler cards assigned to your positions (if applicable)
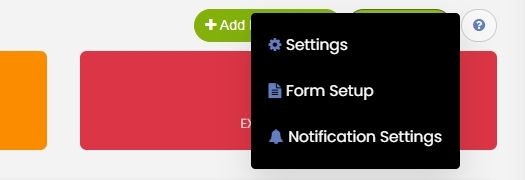
Admin users (Sysop, SuperUser, or Supervisors) see additional action buttons including Add Blood Product and an Options dropdown (Settings, Form Setup, Notification Settings).
1. Coolers
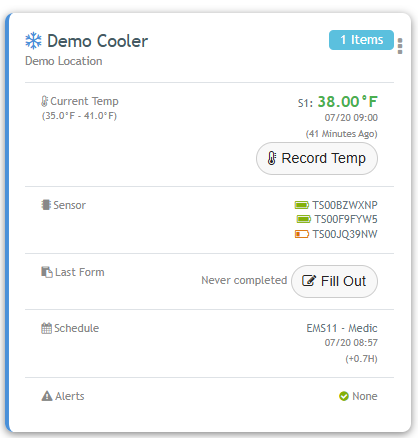
Coolers are temperature-controlled storage units where blood products are kept. Coolers will be assigned to scheduled positions, allowing crew members to record manual temperatures, acknowledge temperature issues, and complete a shift checklist to ensure the cooler is ready for use.
Viewing Coolers: The Dashboard displays all coolers as cards showing the cooler name, location, current temperature, and status. Each cooler card can be clicked to open the Cooler Detail page.
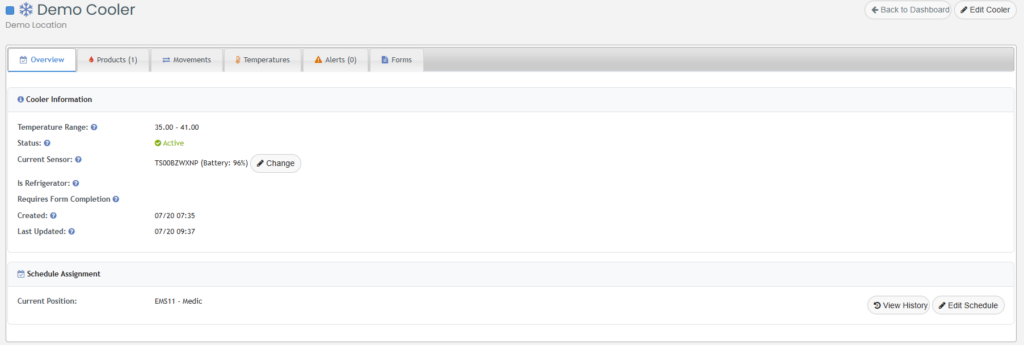
Cooler Detail Page – Clicking a cooler opens a page with these tabs:
- Products – List of blood products currently in this cooler
- Temperature History – Temperature readings over time with a graph; choose a preset range (24 hours, 1 week, or 1 month)
- Movements – History of product movements involving this cooler
- Alerts – Temperature and expiry alerts specific to this cooler
Entering Temperature Readings: Click Enter Temperature to manually log a reading. A 12-hour grid modal opens where you can enter temperatures at each hour. Existing readings are pre-filled.
Admin Actions (Sysop/SuperUser/Supervisor only):
- Add/Edit Cooler – Set cooler name, location, color, temperature min/max thresholds, and whether it requires shift checklists
- Assign Sensor – Link a temperature sensor to the cooler
- Delete Cooler – Remove a cooler (only if it contains no active products)
- Update Schedule – Assign your positions to this cooler
My Coolers Tab – Admin users can filter the cooler list to show only coolers assigned to their positions.
2. Blood Products (PRBCs, Whole Blood, Liquid Plasma)
Blood products are tracked from creation through their entire lifecycle.
Adding a Product
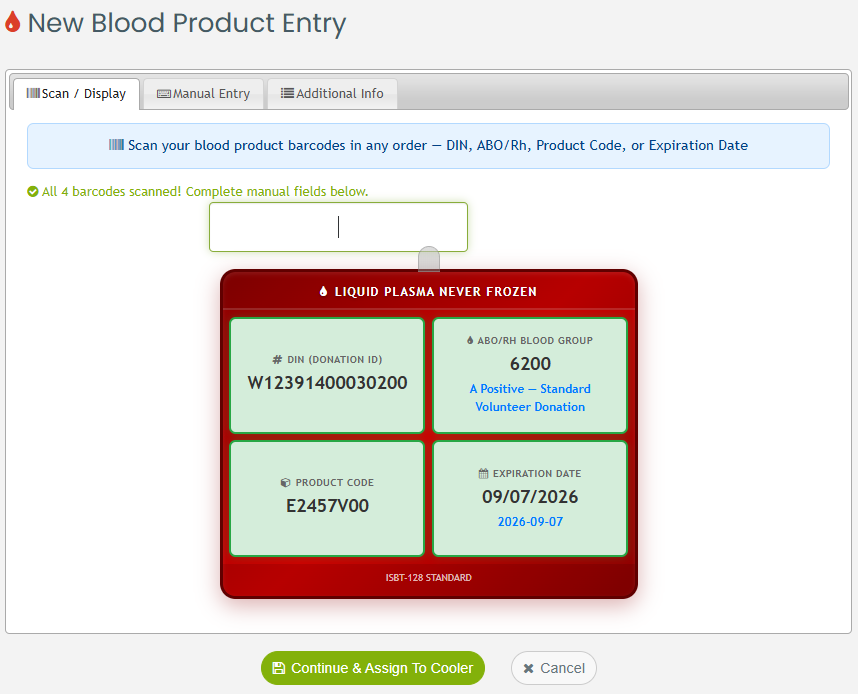
Navigate to Add Blood Product (or Edit Blood Product). The entry page shows a visual blood bag with fields:
- DIN (ISBT-128 ID) – The unique barcode identifier on the blood bag. This is required and must be unique within your agency.
- Product Code – Product type code (e.g., PRBC)
- Blood Type – e.g., O+, A-, B+
- Expiration Date – When the product expires
- Cooler – Which cooler to assign the product to
You can also scan a barcode using a scanner to auto-fill the DIN field.
Viewing Product Details
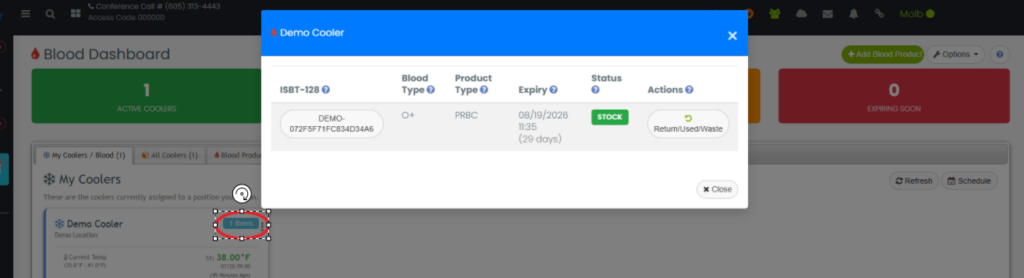
Click a product from any list or scan its QR code to open the Product Detail page, which shows:
- Product Information – DIN, product code, blood type, expiration date, status, and current cooler
- Current Temperature – The latest temperature reading for the cooler holding this product
- Temperature History – Paged list (40 entries per load, up to 200 total) of all temperature readings
- Movement History – Timeline of all status and location changes
- MKT (Mean Kinetic Temperature) – A calculated value representing the thermal history of the product
- Actions – Print Hospital Sheet, Print Return Document, Update Status/Cooler, Archive (Return/Use/Waste)
Updating a Product
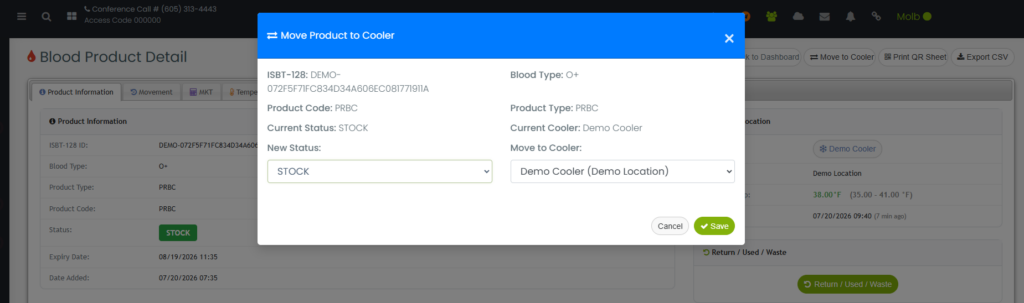
Use Update Status/Cooler on the Product Detail page to:
- Change the product’s status (e.g., from STOCK to DEPLOYED)
- Move the product to a different cooler
- Add comments about the change
Archiving a Product
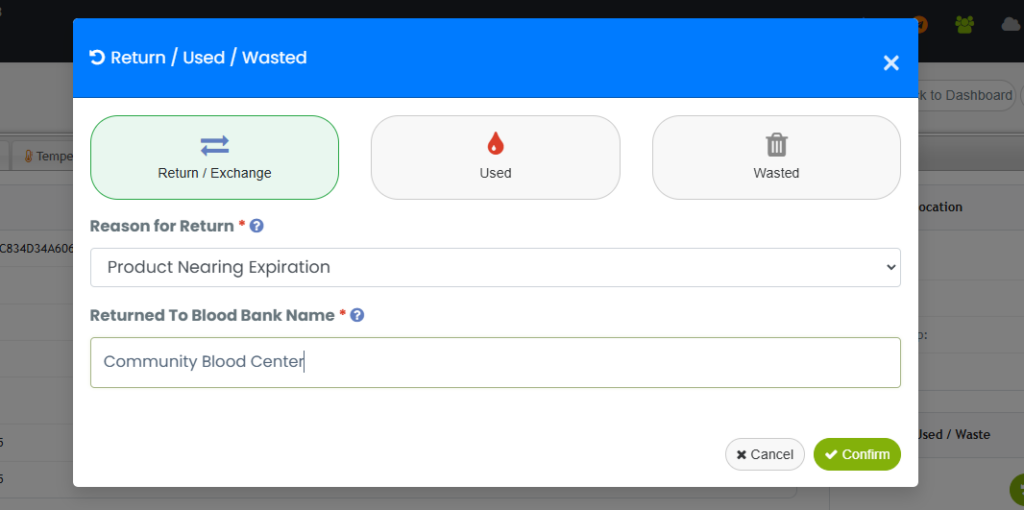
When a product is no longer in your active inventory, use the Return / Used / Wasted modal to archive it. The required fields differ by outcome:
| Outcome | Required Fields |
|---|---|
| Used | Patient ID / MRN Number, Patient Disposition Location |
| Returned | Reason for Return, Returned To Blood Bank Name |
| Wasted | Reason for Discard, Disposal Method / Location, Supervisor/Witness |
Once archived, the product is moved to read-only historical records and no longer appears in active lists.
3. Archived Products

Navigate to Archive from the Dashboard to view finalized products.
Archive List shows archived products with:
- DIN, blood type, product code, and product type
- Expiration date and final status (Used, Returned, or Wasted)
- Final location and reason for archiving
- Date archived and who archived it
You can filter by Product Type and Status. Click any archived product to view its full details, including the complete cooler-residency timeline and temperature history.
4. Alerts
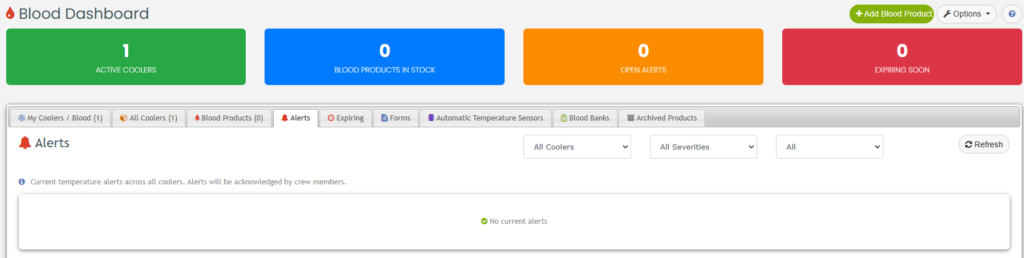
Alerts notify you of temperature deviations and expiring products.
Viewing Alerts: The Dashboard shows alert counts in stat cards. Click any stat card or navigate to the Alerts page for the full alert list.
Alert Filters allow you to narrow results by:
- Cooler – See alerts for a specific cooler
- Severity – WARNING (less urgent) or CRITICAL (more urgent)
- Status – Open, Acknowledged, or All
Alert Types:
- EXPIRY – A product’s expiration date is approaching (based on your configured warning thresholds)
- ABOVE_MAX – Temperature has exceeded the cooler’s maximum threshold
- BELOW_MIN – Temperature has dropped below the cooler’s minimum threshold
Acknowledging Alerts: Select one or more alerts and click Acknowledge to mark them as reviewed. This action is admin-only.
5. Shift Checklists (Forms)
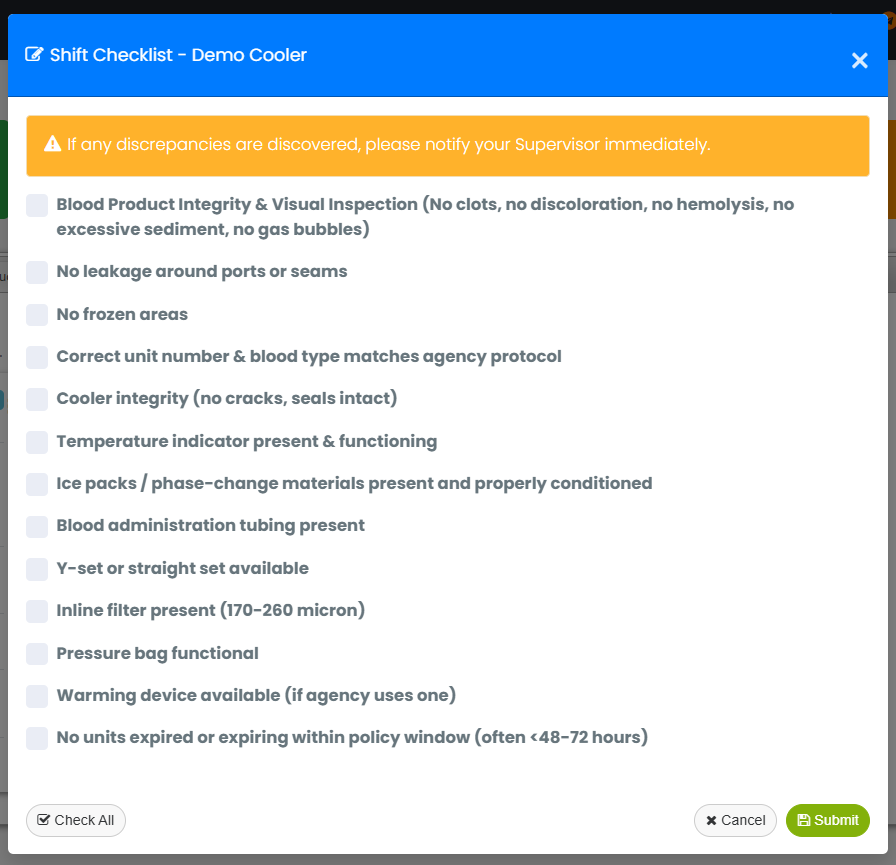
Shift checklists are configurable questionnaires that staff complete periodically during their shift for each cooler.
Configuring Forms (Admin only) – Navigate to Form Setup from the Options menu:
- Form Settings – Set how often forms must be completed (every X hours) and choose an anchor time (e.g., every 4 hours starting at 8:00 AM)
- Form Header – Add a custom header text that appears at the top of each form
- Questions – Add, edit, reorder, or delete checklist questions. Each question is a checkbox with an optional tooltip
Completing Forms – When a shift checklist is due, you’ll be prompted to fill it out for the relevant cooler. All questions are answered by checking boxes. Questions that remain unchecked at submission are flagged for review. You can also add discrepancy notes before submitting.
Viewing Completed Forms – Navigate to the Forms tab on the Dashboard to see a list of all submitted checklists. Filter by cooler, user, or comment presence. Click View to see the full checklist with answers and any comments.
6. Sensors

Temperature sensors provide automatic temperature readings for your coolers. We have integrations to Temp Stick and Traceable Live. Both are registered trademarks of their respective companies.
Sensor Management (Admin only) – Access from the Options menu to:
- View all sensors – See sensor serial numbers, battery levels, vendor type, and which cooler each sensor is assigned to
- Unassigned sensors – View sensors available for assignment
- Add/Edit sensor – Update sensor details
- Delete sensor – Remove a sensor permanently
Sensor Assignment – On a cooler’s detail page, use Change Sensor to assign or reassign a sensor to that cooler.
Discovering New Sensors – From the Options menu, use Discover Sensors to find sensors connected to your vendor accounts:
- Traceable LIVE – Logs into your Traceable LIVE account and discovers all sensors on the account
- Temp Stick – Calls the Temp Stick API to discover sensors
Vendor Credentials – Before discovering sensors, you must configure your vendor credentials:
- Go to Options > Settings to enter your Traceable LIVE Client ID and Client Secret, or your Temp Stick API key
7. Print Documents
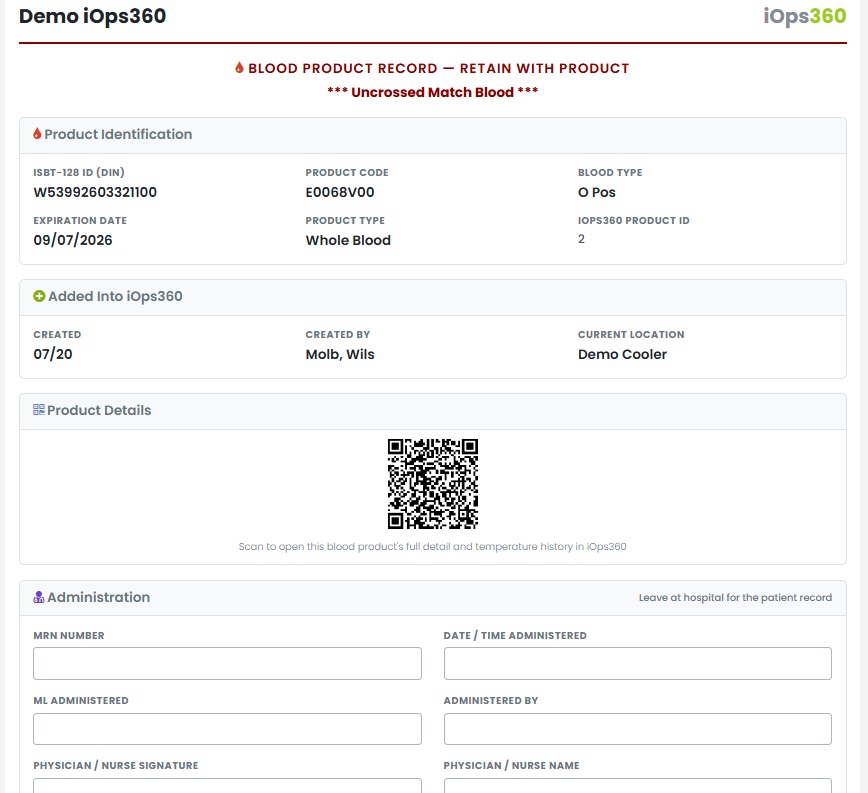
Hospital Sheet
From the Product Detail page, click Print Hospital Sheet to generate a one-page document that can be printed and placed with the physical blood product (e.g., left at a hospital). It shows:
- Product identification (DIN, blood type, product code, expiration date)
- A QR code linking to the full product detail page for later temperature lookup
Return Document
From the Product Detail page, click Print Return Document to generate a chain-of-custody return document showing:
- Product information
- Full temperature history
- Mean Kinetic Temperature (MKT) calculation
- QR code for verification
8. Blood Banks
Blood Banks are reference entries for external blood bank organizations you interact with.
Managing Blood Banks (Admin only) – From the Options menu:
- Add Blood Bank – Create a new entry with name, description, phone, website, and manager contact info
- Edit Blood Bank – Update an existing entry
- Delete Blood Bank – Remove an entry
9. Settings
Admin users can configure module-wide settings from the Options menu.
General Settings:
- Temperature Unit – Fahrenheit (F) or Celsius (C)
- Check Interval – How often sensors should report temperatures (in minutes)
- Allow FFP – Enable tracking for Fresh Frozen Plasma products in addition to standard blood products
- Expiration Warning Days – Set two warning thresholds (e.g., warn at 14 days, then again at 7 days before expiry)
- FFP Expiration Warning Days – Separate thresholds if FFP tracking is enabled
- Auto Sensor Manual Check Frequency – How often a manual temperature check is required as backup for automated sensors
- Auto Sensor Battery Alert % – Battery level percentage that triggers a low-battery alert
Notification Settings (Admin only):
- Set the same expiration warning thresholds
- Select which users and positions should receive notifications
Quick Reference: Access Levels
| Action | Regular User | Admin (Sysop/SuperUser/Supervisor) |
|---|---|---|
| View Dashboard | Yes | Yes |
| View Coolers | Yes | Yes |
| Enter Temperature Readings | Yes | Yes |
| View Product Details | Yes | Yes |
| Add/Edit Blood Products | No | Yes |
| Update Product Status/Cooler | Yes | Yes |
| Archive Products | Yes | Yes |
| View/Complete Forms | Yes | Yes |
| Configure Forms | No | Yes |
| Manage Sensors | No | Yes |
| Manage Coolers | No | Yes |
| Change Settings | No | Yes |
| Acknowledge Alerts | No | Yes |
| Manage Blood Banks | No | Yes |
Common Workflows
Receiving a New Blood Product
- Navigate to Add Blood Product
- Scan the DIN barcode or type it manually
- Fill in product code, blood type, and expiration date
- Select the cooler to assign it to
- Save and print the Hospital Sheet to place with the physical bag
Performing a Shift Temperature Check
- Go to the Cooler Detail page for each cooler on your shift
- Click Enter Temperature
- Fill in the 12-hour grid with current readings
- Add notes for any out-of-range temperatures
- Save
Completing a Shift Checklist
- When prompted (or navigate to Forms on the Dashboard)
- Check all questions that pass
- Add discrepancy notes for any issues
- Submit
Processing a Product Return or Disposal
- Open the Product Detail page
- Click the Return / Used / Wasted button
- Select the outcome type
- Fill in the required fields for that outcome
- Submit to archive the product
Responding to an Alert
- Check the Dashboard for alert notifications
- Click an alert or go to the Alerts page
- Review the alert details (temperature, cooler, threshold)
- Take appropriate action (check the cooler, move a product, etc.)
- Admin users can Acknowledge alerts to clear them
Non-Admin View:
The non